|
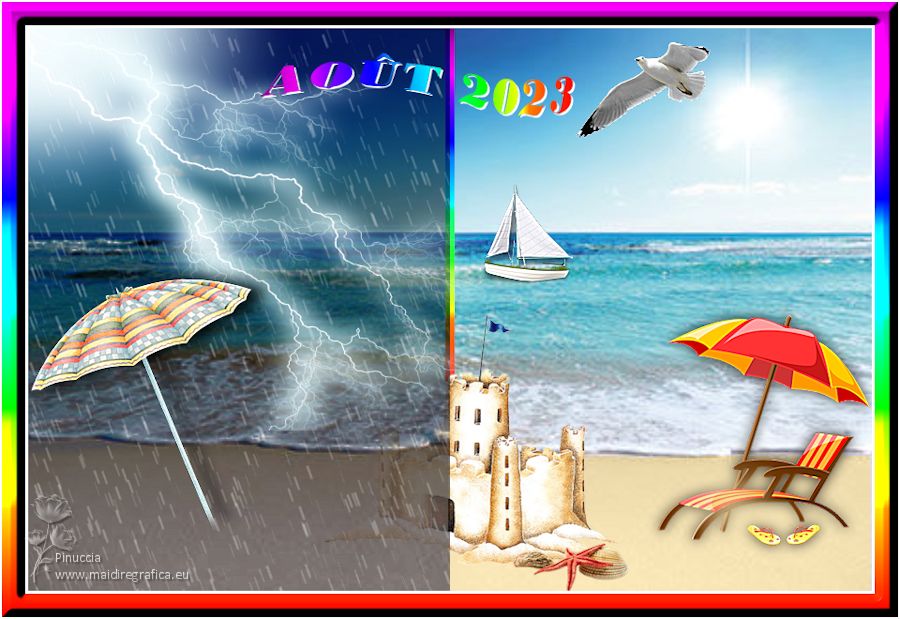
PARAPLUIE OU OMBRELLE ?
 UMBRELLA OR PARASOL ? UMBRELLA OR PARASOL ?
Thanks Evalynda for the invitation to translate your tutorials
This tutorial was translated with PSPX and PSPX3, but it can also be made using other versions of PSP.
Since version PSP X4, Image>Mirror was replaced with Image>Flip Horizontal,
and Image>Flip with Image>Flip Vertical, there are some variables.
In versions X5 and X6, the functions have been improved by making available the Objects menu.
In the latest version X7 command Image>Mirror and Image>Flip returned, but with new differences.
See my schedule here
 italian translation here italian translation here
 your versions here your versions here
For this tutorial, you will need:

The material is by Evalynda
(The links of material creators here).

consult, if necessary, my filter section here
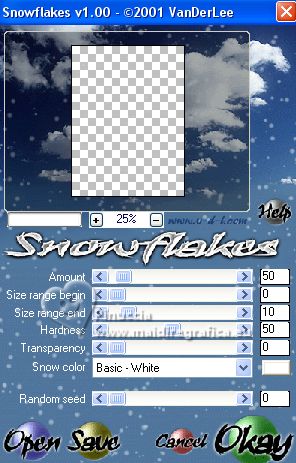
VanDerLee - Snowflakes here
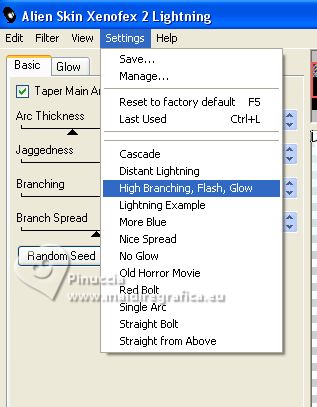
Alien Skin Xenofex 2 - Lightning here

You can change Blend Modes according to your colors.

(Don't forget to erase the watermarks of the tubes and don't save the modifications when you'll close them)
If you don't have it, copy the Gradient Rainbow in the Gradients Folder.
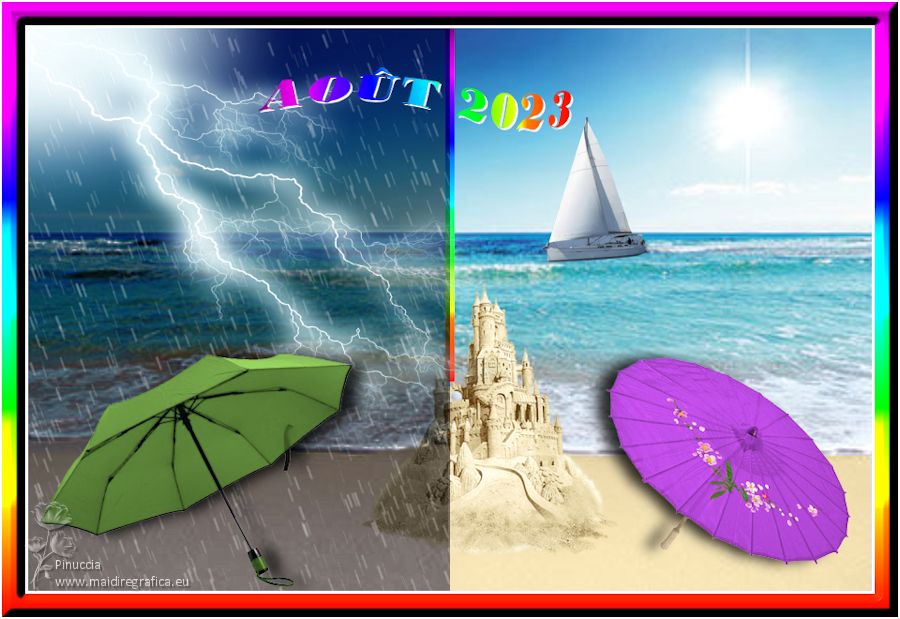
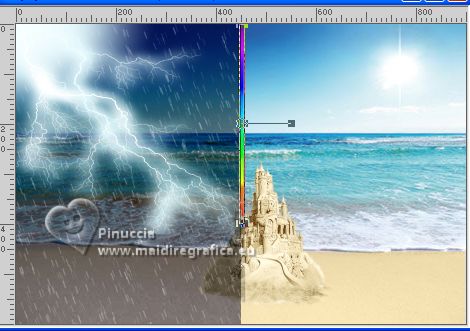
1. Open a new transparent image 900 x 600 pixels.
Selections>Select All.
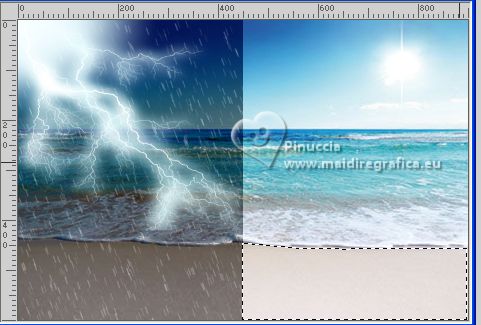
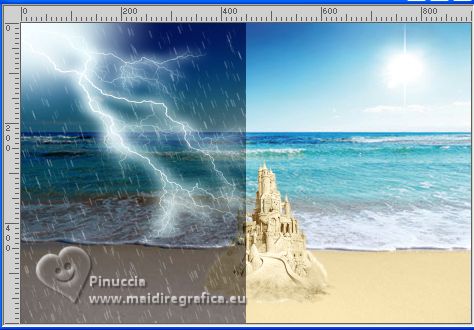
Open your landscape image plage-juan-les-pins 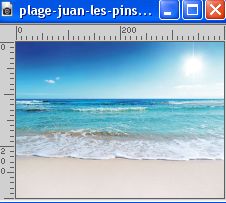
(attention please: if your image has a sun, it must be on the right)
Edit>Copy.
Go back to your work and go to Edit>Paste into Selection.
Optional: Adjust>Sharpness>Sharpen.
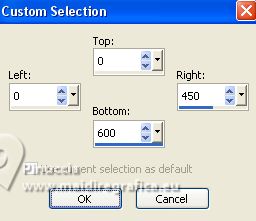
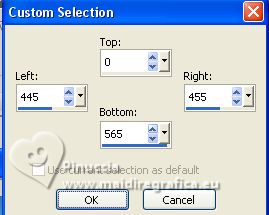
2. Selection Tool 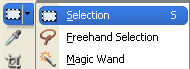
(no matter the type of selection, because with the custom selection your always get a rectangle)
clic on the Custom Selection 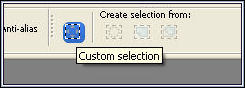
and set the following settings.
Selections>Promote Selection to Layer.
Change the Blend Mode of this layer to Multiply.
Adjust>Backlighting Filter
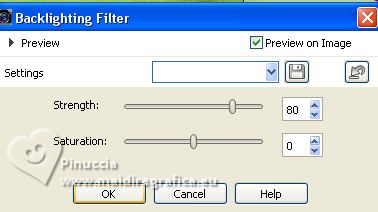
Edit>Repeat Backlighting Filter.
Keep selected.
3. Layers>New Raster Layer.
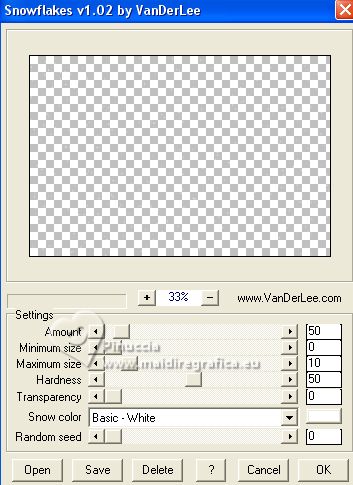
Effects>Plugins>VanDerLee - Snowflakes
if you use the previous version (the result doen't change).
Effects>Plugins>Adrenaline - Snowflakes
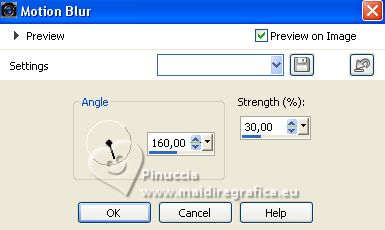
Adjust>Blur>Motion Blur.
Layers>Duplicate.
Layers>Merge>Merge Down.
Adjust>Sharpness>Sharpen.
Keep still selected.
4. Layers>New Raster Layer.
Effects>Plugins>Alien Skin Xenofex 2 - Lightning
Settings: High Branching,Flash,Glow and ok.
Repeat this Effect another time.
5. Layers>New Raster Layer.
Effects>Plugins>Alien Skin Xenofex 2 - Lightning
Click one time on Random Seed and ok.

Repeat this Effect another time (withing changing anything).
Selections>Select None.
Layers>Merge>Merge Down.
Layers>Arrange>Move down.
6. K key on the keyboard to activate your Pick Tool 
to move the bolts, push the lower central node up

7. If you chose a beach image and decided to later use a tube of sand castles, like in my example...
activate the Raster layer.
Activate your Freehand Selection Tool 

Draw a selection on the sand in the light part of the image (right).
Selections>Promote Selection to Layer.
Keep selected.
8. Open you castle's tube, for me Chateau de sable 3 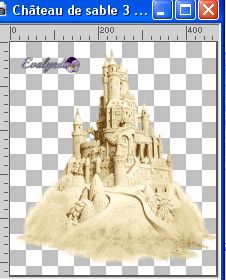
Activate your Dropper Tool 
and left click on a sand color to set it as the foreground color,
(for me, color #d2c091  ) )
9. Go back to your work.
Flood Fill  the selection with your foreground color. the selection with your foreground color.
Layers>Arrange>Move Down.
Activate the layer Raster 1.
Change the Blend Mode of this layer to Luminance (legacy).
Layers>Merge>Merge Down.
Selections>Select None.
the color of the sand will be better harmonized with that of the sand castele
Evidently, points 7,8 and 9 are useless if your background image is not a beach
and you are not going to add a sand castle
10. Activate again your castle's tube.
Erase the watermark and go to Edit>Copy.
Go back to your work and go to Edit>Paste as new layer.
For the supplied tube: Image>Resize, to 60%, resize all layers not checked.
Move  the tube down in the center. the tube down in the center.
11. Optional (depend on your landscape's colors).
Activate your Selection Tool , rectangle,
and draw a rectangle on the dark zone

Adjust>Backlighting Filter, same settings.
Selections>Select None.
15. Activate your bottom layer.
Layers>New Raster Layer.
Custom Selection
NOTE: these settings are for the size of your sandcastele.
Adapt them if you use another tube...
16. Set your foreground color to Gradient and set the gradient Rainbow, style Linear
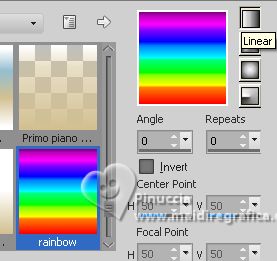
Standard Raibow gradient in PSP doesn't give the same result
Flood Fill the selection with your Gradient.
Selections>Select None.
14. Activate your Pick Tool
Zoom  the image, if necessary, the image, if necessary,
push the bottom middle nod up,
so that the 7 colors of the rainbow are visible behind the castle
15. Activate your top layer of lightning.
Open the tube Parapluie-Evalynda3 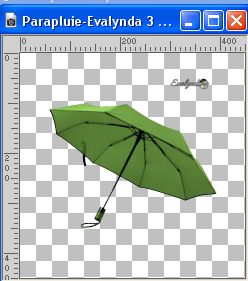
Erase the watermark and go to Edit>Copy.
Go back to your work and go to Edit>Paste as new layer.
Resize, and colorize to your liking (if you choose another tube).
Image>Mirror.
Move the tube to the left.
Effects>3D Effects>Drop Shadow, at your choice.
15. Open the parasol tube Ombrelle_Evalynda_4 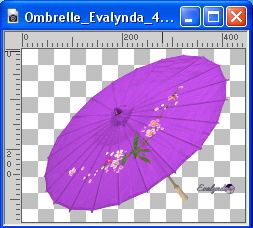
Erase the watermark and go to Edit>Copy.
Go back to your work and go to Edit>Paste as new layer.
Image>Mirror.
Colorize, to your liking.
Image>Resize, to 70%, resize all layers not checked.
Move the tube to the right.
Effects>3D Effects>Drop Shadow, at your choice.
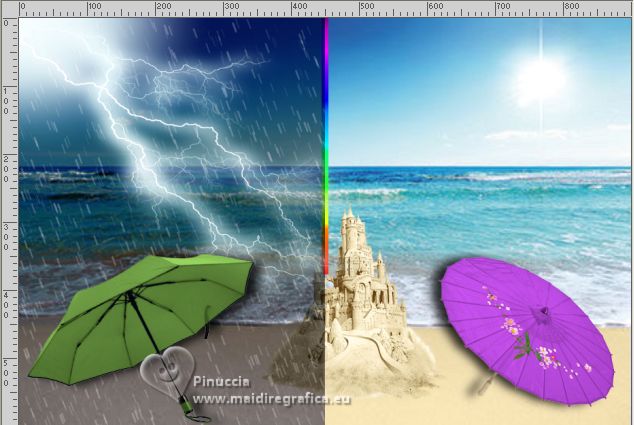
16. Open the tube 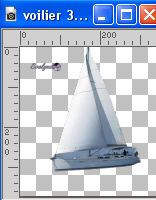
Erase the watermark and go to Edit>Copy.
Go back to your work and go to Edit>Paste as new layer.
Image>Resize, to 50%, resize all layers not checked.
Move the tube to the background.
Add other decorative elements of your choice
(shells, birds, balls, coke cans...)
17. Open the text 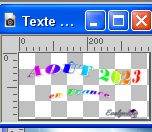
(or write your text)
Edit>Copy (both parts of the text or only one).
Go back to your work and go to Edit>Paste as new layer.
Move the text to your liking.
18. Image>Add borders, 3 pixels, symmetric, color white.
Selections>Select All.
Image>Add borders, 25 pixels, symmetric, color white.
Selections>Invert.
Flood Fill the selection with the gradient Rainbow
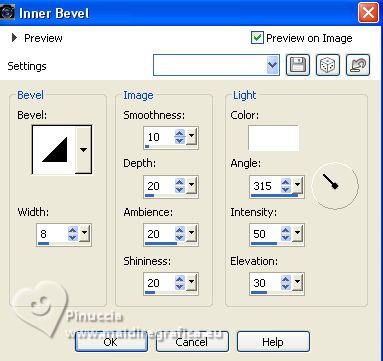
19. Effects>3D Effects>Inner Bevel.
Selections>Select None.
20. Image>Add borders, 2 pixels, symmetric, color white.
Image>Resize, 900 pixels width, resize all layers checked.
21. Sign your work and save as jpg.
If you have problems or doubts, or you find a not worked link,
or only for tell me that you enjoyed this tutorial, write to me.
26 August 2023

|