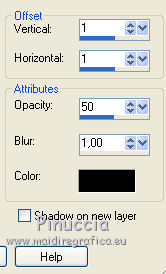
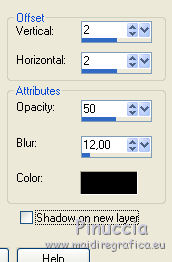
|
BELLE DE MAI

english version
Here you find the original of this tutorial:
This tutorial was written with CorelX8 and translated with CorelX12, but it can also be made using other versions of PSP.
Since version PSP X4, Image>Mirror was replaced with Image>Flip Horizontal,
and Image>Flip with Image>Flip Vertical, there are some variables.
In versions X5 and X6, the functions have been improved by making available the Objects menu.
In the latest version X7 command Image>Mirror and Image>Flip returned, but with new differences.
See my schedule here
italian translation here
your versions here
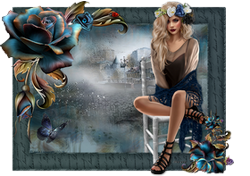
Un tube of yours.
The rest of the material here
Il tube della donna è di Babette
(modificato con l'aggiunta di un ramo di mughetto; nel materiale trovi anche il tube originale)
Gli altri tube sono stati trovati su Internet.
(The links of the tubemakers here).

In the newest versions of PSP, you don't find the foreground/background gradient (Corel_06_029).
You can use the gradients of the older versions.
The Gradient of CorelX here
Copy the selection in the Selection Folder.
Copy the styled line @qua_losange in the Styled Lines Folder.
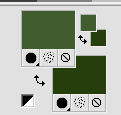
Set your foreground color to #415d2f,
set your background color to #263e0f.
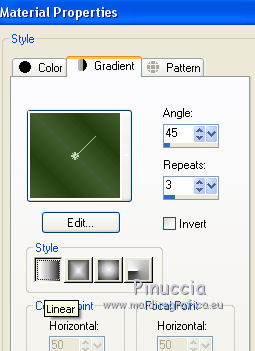
Set your foreground color to a Foreground/Background Gradient, style Linear
1. Open a new transparent image 900 x 600 pixels.
Flood Fill  the trasparent image with your dark background color #263e0f. the trasparent image with your dark background color #263e0f.
2. Layers>New Raster Layer.
Selections>Select All.
Open the tube brin_de_muguet 17a11 and go to Edit>Copy.
Go back to your work and go to Edit>Paste into Selection.
Sélections>Select None.
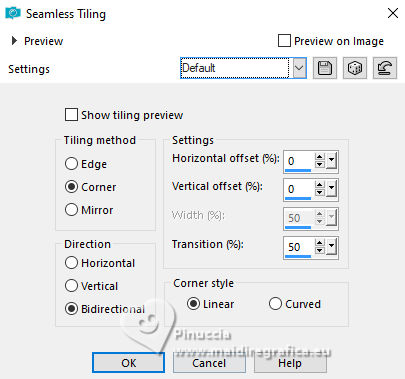
3. Effects>Image Effects>Seamless Tiling, default settings.
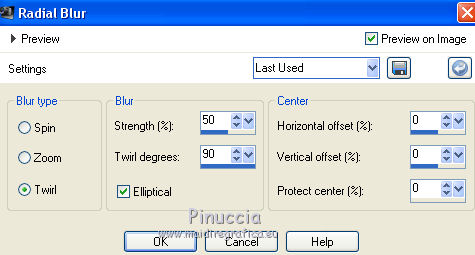
4. Adjust>Blur>Radial Blur.
Layers>Merge>Merge Down.
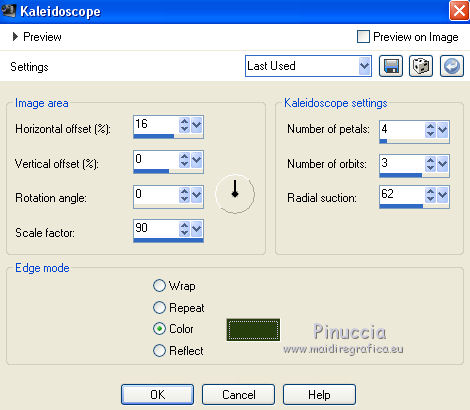
5. Effects>Reflection Effects>Kaleidoscope, dark background color #263e0f.
6. Layers>New Raster Layer.
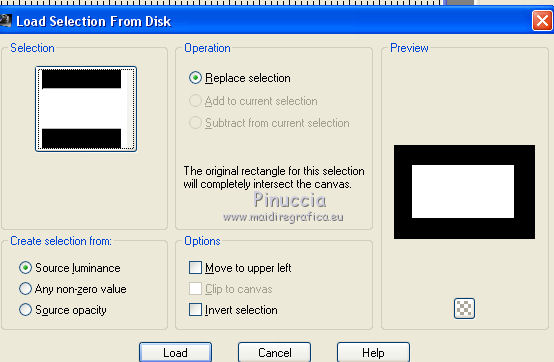
Selections>Load/Save Selection>Load Selection from Disk.
Look for and load the selection sélection 1 1er mai.
Flood Fill the selection with your Gradient.
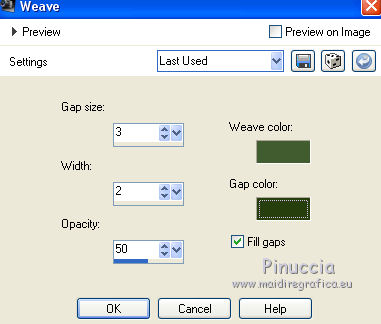
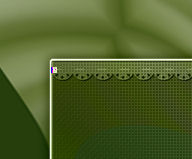
Effects>Texture Effects>Weave
Weave color: foreground color #415d2f,
gap color: background color #263e0f.
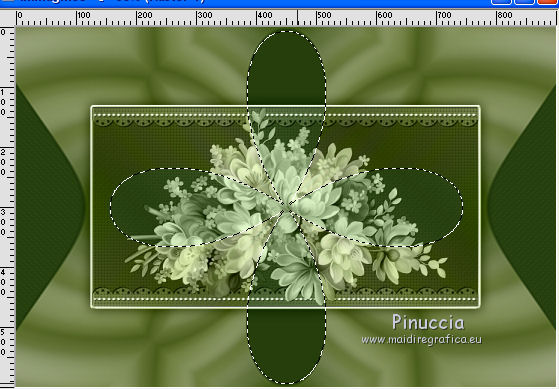
7. Selections>Modify>Select Selection Border.

Set your foreground color to the light color #d7e9e6.
Flood Fill the selection with your light foreground color.
Keep selected.
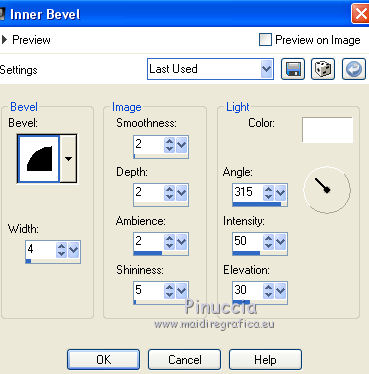
Effects>3D Effects>Inner Bevel.
Sélections>Select None.
8. Open the tube feston and go to Edit>Copy.
Go back to your work and go to Edit>Paste as new layer.
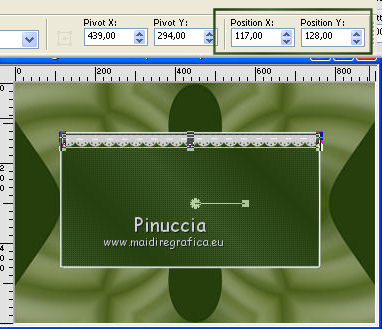
K key to activate the Pick Tool 
and set Position X: 117,00 and Position Y: 128,00.
9. Layers>Duplicate.
Image>Flip.
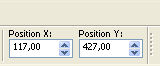
Pick Tool
and set Position X: 117,00 and Position Y: 427,00.
M Key to deselect the Too.
Layers>Merge>Merge Down.
Change the Blend Mode of this layer to Overlay.
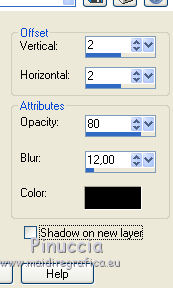
Effects>3D Effects>Drop Shadow, color black.
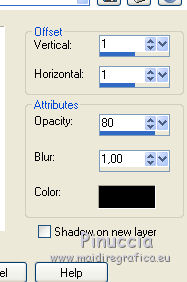
Repeat Drop Shadow, vertical and horizontal -1.
10. Layers>Merge>Merge Down.
Change the Blend Mode of this layer to Luminance (héritée).
Effects>3D Effects>Drop Shadow, color black.
Objects>Align>Center in Canvas,
or Edit>Cut and Edit>Paste as new layer
and the frame will be exactly in the middle
(you may delete the layer empty).
11. Set your foreground color to white #ffffff.
Activate the Pen Tool  , ,
styled line @qua_losange, width 4 pixels.

Click on the starting point on the left
and then on the point of arrival on the right.
And the line will trace itself.

Layers>Promote Selection to Layer.
Layers>Duplicate.
Move  the line down. the line down.
Layers>Merge>Merge Down.
Effects>3D Effects>Drop Shadow, color black.
Again Layers>Merge>Merge Down.
12. Open the tube deco_fleur and go to Edit>Copy.
Go back to your work and go to Edit>Paste as new layer.
Image>Resize, to 83%, resize all layers not checked.
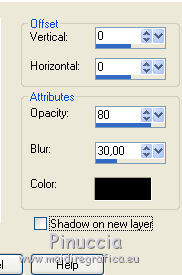
Effects>3D Effects>Drop Shadow, color black.
Repeat Drop Shadow, vertical and horizontal -1.
Layers>Merge>Merge Down.
13. Activate the bottom layer.
Activate the Magic Wand Tool 

and click on the green border on the right, to select it.

Selections>Promote Selection to layer.
Effects>Texture Effects>Weave, same settings.
Sélections>Select None.
Layers>Duplicate.
Image>Mirror.
Layers>Merge>Merge Down.
14. Activate again the layer Raster 1.
Activate the Magic Wand Tool
and click on the petals to select them.
Selections>Promote Selection to layer.
Effects>Texture Effects>Weave, same settings.
Sélections>Select None.
15. Activate the top layer.
Open "tube déco dentelle" and go to Edit>Copy.
Go back to your work and go to Edit>Paste as new layer.
Image>Resize, to 83%, resize all layers not checked.
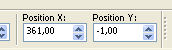
Pick Tool
and set Position X: 361,00 and Position Y: -1,00.
16. Layers>Duplicate.
Image>Flip.
Layers>Merge>Merge Down.
Effects>3D Effects>Drop Shadow, color black.
Repeat Drop Shadow, vertical and horizontal -2.
Layers>Arrange>Move Down.
17. Open the tube "autre" and go to Edit>Copy.
Go back to your work and go to Edit>Paste as new layer.
Image>Resize, to 110%, resize all layers not checked.
Don't move it.
Effects>3D Effects>Drop Shadow, color black.
18. Activate the layer Raster 1.
Open the tube fond CLaurette and go to Edit>Copy.
Go back to your work and go to Edit>Paste as new layer.
Change the Blend Mode of this layer to Luminance (legacy) or other.
Effects>3D Effects>Drop Shadow, color black.
19. Activate the top layer.
Opern the tube Arabesque Muguet and go to Edit>Copy.
Go back to your work and go to Edit>Paste as new layer.
Image>Resize, to 95%, resize all layers not checked.
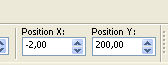
Pick Tool
and set Position X: -2,00 and Position Y: 200,00.
20. Layers>Duplicate.
Image>Mirror.
Layers>Merge>Merge visible.
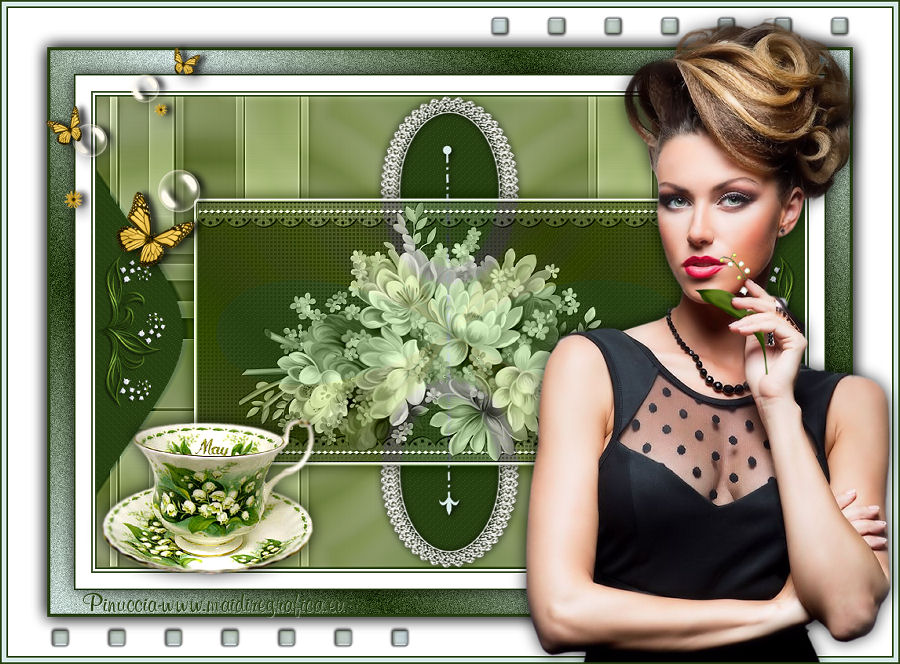
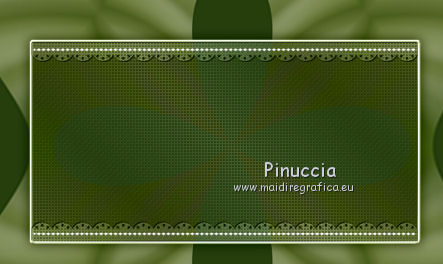
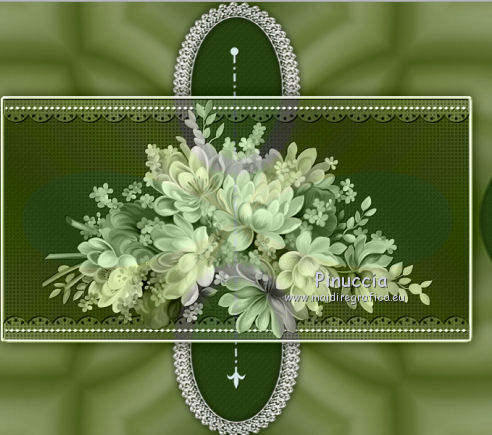
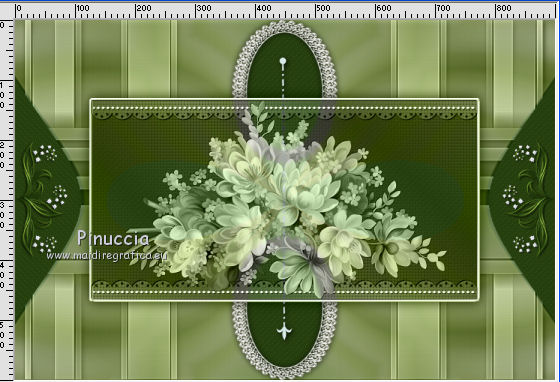
You should have this
21. Image>Add borders, 2 pixels, symmetric, dark color #263e0f.
Image>Add borders, 3 pixels, symmetric, color white.
Image>Add borders, 2 pixels, symmetric, dark color #263e0f.
Image>Add borders, 20 pixels, symmetric, color white.
22. Image>Add borders, 2 pixels, symmetric, dark color #263e0f.
Image>Add borders, 30 pixels, symmetric, color white.
Image>Add borders, 2 pixels, symmetric, dark color #263e0f.
Activate the Magic Wand Tool
and click on the 30 pixels white border to select it.
Set your foreground color to #d7e9e6,
set your background color to #263e0f.
Set your foreground color to a Foreground/Background Gradient, style Linear
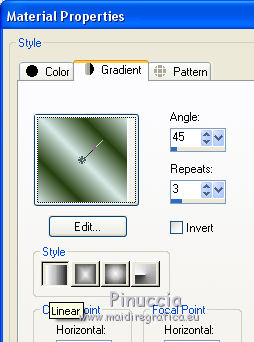
Flood Fill the selection with your Gradient.
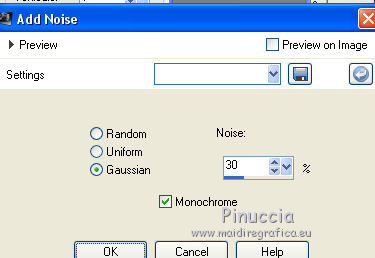
Adjust>Add/Remove Noise>Add Noise.
Selections>Invert.
Effects>3D Effects>Drop Shadow, color black.
Sélections>Select None.
23. Image>Add borders, 2 pixels, symmetric, dark color #263e0f.
Image>Add borders, 50 pixels, symmetric, color white.
Select the white border with your Magic Wand Tool
Selections>Invert.
Effects>3D Effects>Drop Shadow, same settings.
Edit>Repeat Drop Shadow.
24. Open the tube papillons et bulles and go to Edit>Copy.
Go back to your work and go to Edit>Paste as new layer.
Move the tube to the left side.
25. Open the tube déco tasse muguet and go to Edit>Copy.
Go back to your work and go to Edit>Paste as new layer.
Move the tube at tbe bottom left.
Effects>3D Effects>Drop Shadow, color black.
26. Open the tube déco coin and go to Edit>Copy.
Go back to your work and go to Edit>Paste as new layer.
Don't move it.
27. Image>Add borders, 2 pixels, symmetric, #263e0f.
Image>Add borders, 6 pixels, symmetric, #d7e9e6.
28. Open the tube woman babette and go to Edit>Copy.
Go back to your work and go to Edit>Paste as new layer.
Move the tube to the right side.
Adjust>Sharpness>Sharpen.
Effects>3D Effects>Drop Shadow, same settings.
29. Image>Add borders, 2 pixels, symmetric, dark color #263e0f.
Image>Resize, 900 pixels width, resize all layers checked.
Sign your work and save as jpg.
If you have problems or doubts, or you find a not worked link,
or only for tell me that you enjoyed this tutorial, write to me.
30 April 2018
|