|
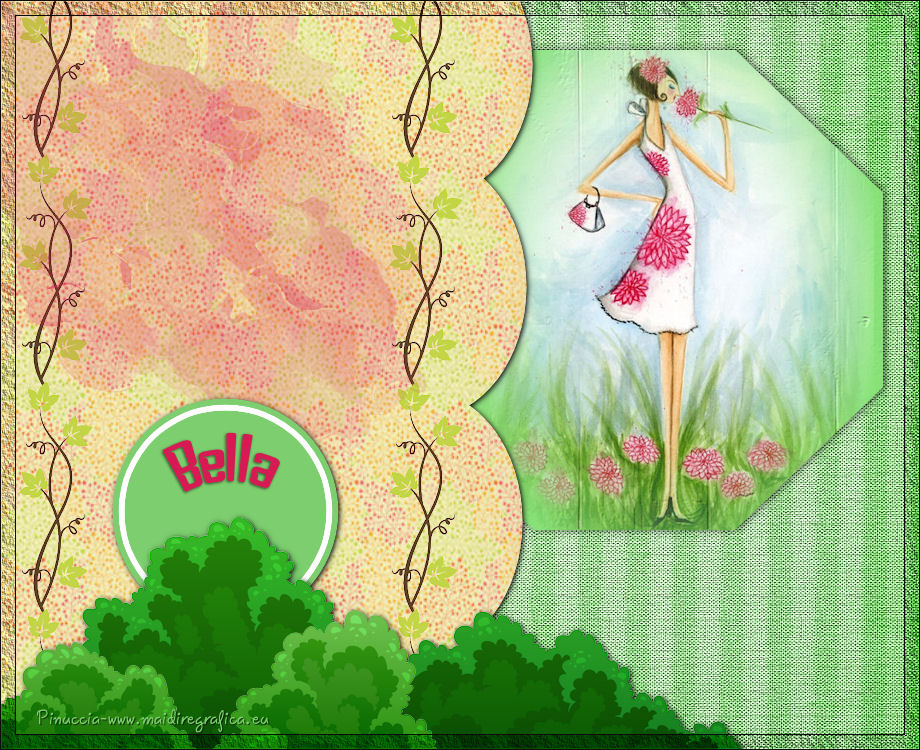
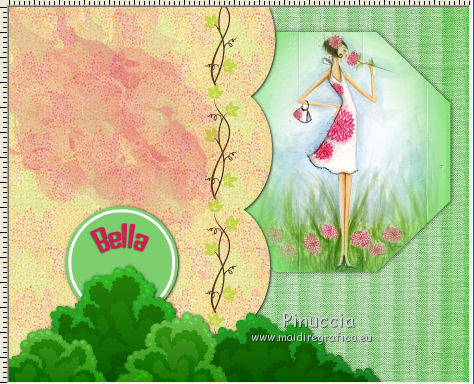
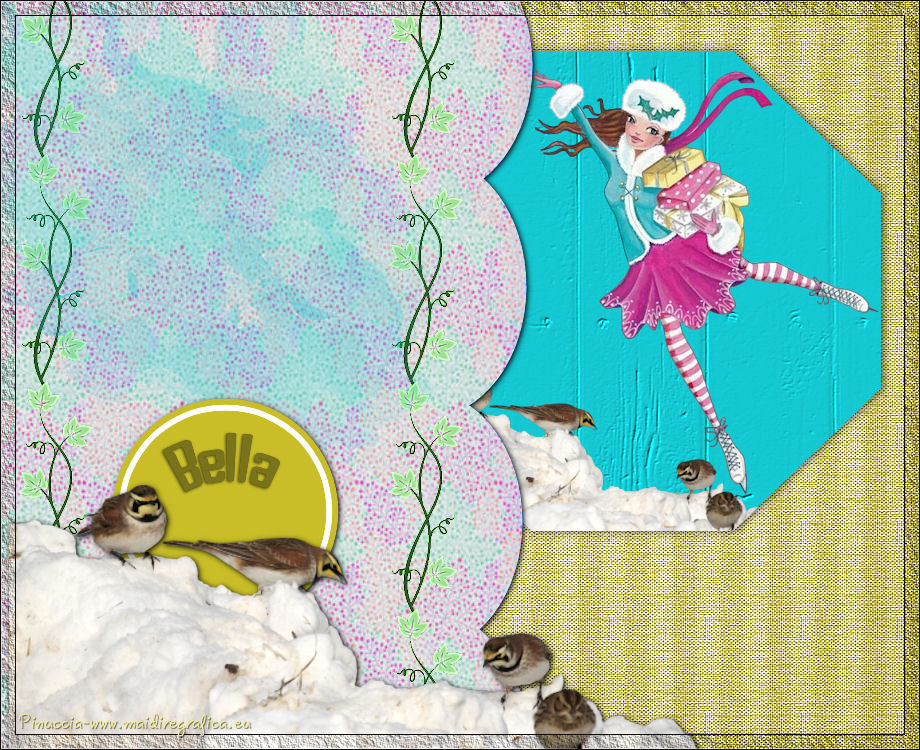
BELLA
english version
Thanks Sabine for inviting to translate your tutorials into english.
This tutorial is a personal creation of Sabine and it is prohibited to copy or distribute it on the net (forums, groupes.. etc), or to use it on commercials sites.
This tutorial was created with Corel16 and translate with CorelX3, but can also be made using other versions of PSP.
Since version PSP X4, Image>Mirror was replaced with Image>Flip Horizontal,
and Image>Flip with Image>Flip Vertical, there are some variables.
In versions X5 and X6, the functions have been improved by making available the Objects menu.
In the latest version X7 command Image>Mirror and Image>Flip returned, but with new differences.
See my schedule here
For this tutorial, you will need:
Material here
Plugins
consult, if necessary, my filter section here
Alien Skin Eye Candy 5 Impact - Perspective Shadow here
Filters Unlimited 2.0 here
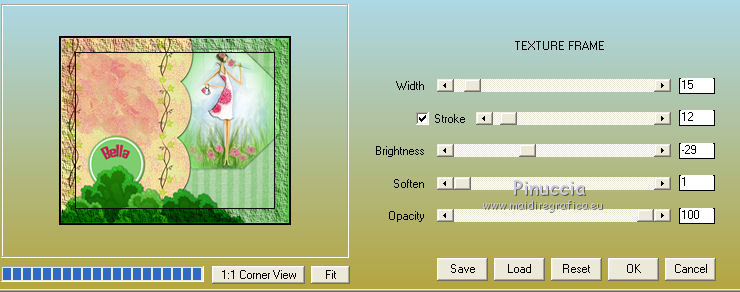
AAA Frames - Texture Frame here

You can change Blend Modes according your colors.
Place the brush in Brush folder. Attention, please, the brush is composed by two files, you must place both the files in the folder.
See my notes about Brushes here
Copy the texture texture3_Bella in the Textures Folder.
Copy the selections in the Selections Folder.
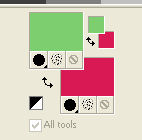
Set your foreground color to #7cce6e,
and your background color to #d81a54
1. Open a new transparent image 920 x 750 pixels.
2. Selections>Select All.
Open the texture texture_Bella and go to Edit>Copy.
Go back to your work and go to Edit>Paste into Selection.
Selections>Select None.
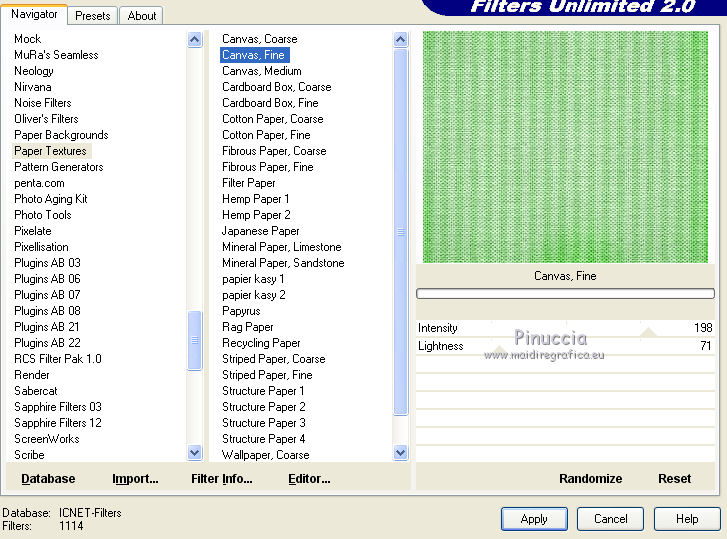
Effects>Plugins>Filters Unlimited 2.0 - Paper Textures - Canvas Fine.
Adjust>Sharpness>Sharpen More.
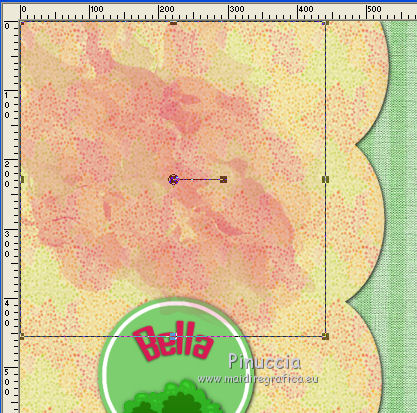
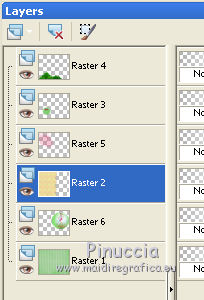
3. Layers>New Raster Layer (raster 2).
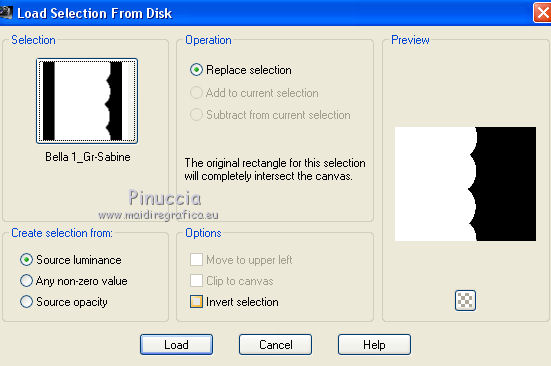
Selections>Load/Save Selection>Load Selection from Disk.
Look for and load the selection Bella 1_Gr-Sabine.
Open the texture texture2_Bella and go to Edit>Copy.
Go back to your work and go to Edit>Paste into Selection.
Selections>Select None.
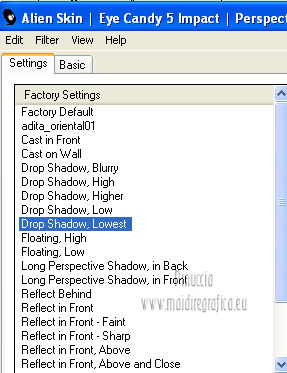
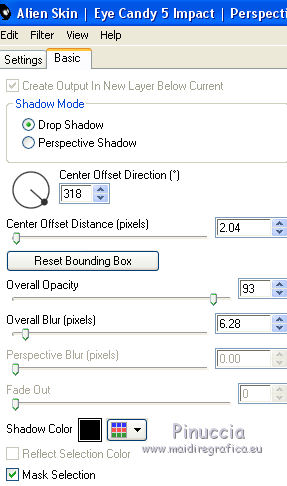
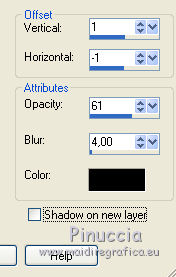
Effects>Plugins>Alien Skin Eye Candy 5 Impact - Perspective Shadow.
5. Layers>New raster Layer (raster 3).
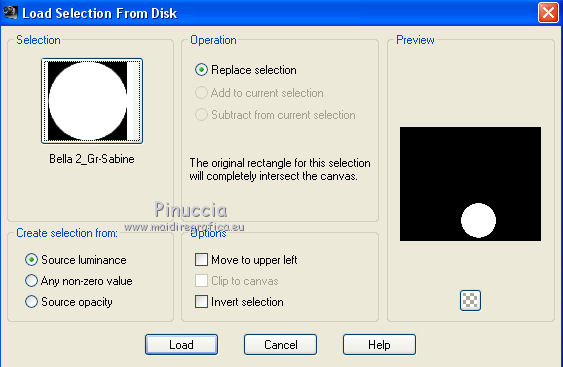
Selections>Load/Save Selection>Load Selection from Disk.
Look for and load the selection Bella 2_Gr-Sabine.
Flood Fill  with your foreground color #7cce6e. with your foreground color #7cce6e.
Keep Selected.
Selections>Modify>Contract - 6 pixels.

Set your background color to white #ffffff,
Flood Fill with your background color #ffffff.
Again Selections>Modify>Contract - 6 pixels.
Flood Fill with you foreground color #7cce6e.
Selections>Select None.
5. Open the tube "titre" and go to Edit>Copy.
Go back to your work and go to Edit>Paste as new layer (raster 4).
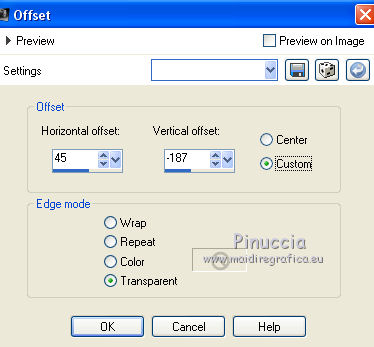
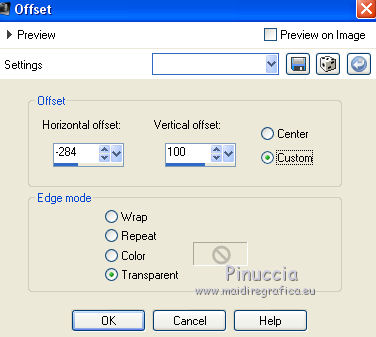
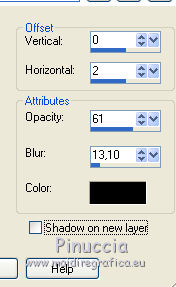
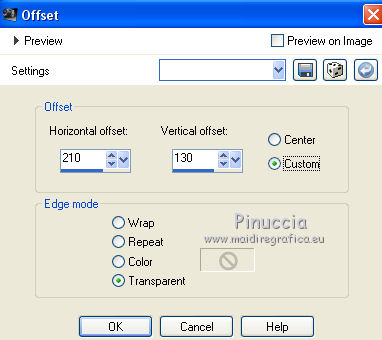
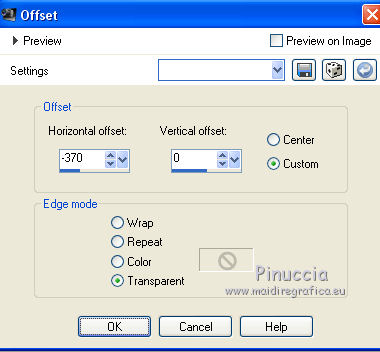
Effects>Image Effects>Offset.
Effects>3D Effects>Drop Shadow.
Layers>Merge>Merge down.
Effects>Plugins>Alien Skin Eye Candy 5 Impact - Perspective Shadow, same settings.
6. Open the tube Déco Bella Gr-Sab1 and go to Edit>Copy.
Go back to your work and go to Edit>Paste as new layer (raster 4).
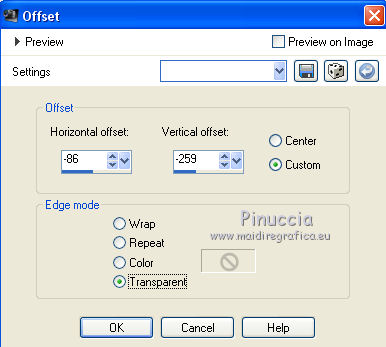
Effects>Image Effects>Offset.
Effects>Plugins>Alien Skin Eye Candy 5 Impact - Perspective Shadow, same settings.
7. Activate the layer of the text (raster 3).
Effects>Image Effects>Offset.
8. Activate the top layer.
Layers>New Raster Layer (raster 5).
Activate the Paint Brush Tool 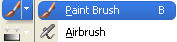
Look for and select the brush Bella_grsabine.

Set again your background color to #d81a54.
Apply the brush in the upper left.

if your PSP does not allow brushes over 500 pixels,
apply the brush to the maximum size, and after you apply it,
activate the pick tool 
and use the nodes to enlarge the brush as in the example.
Layers>Arrange>Move down - 2 times.
9. Activate the bottom layer (raster 1).
Layers>New Raster Layer (raster 6).
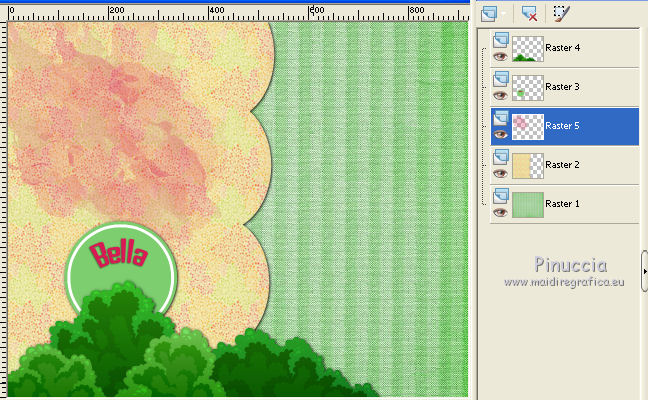
Selections>Load/Save Selection>Load Selection from Disk.
Look for and load the selection Bella 3_Gr-Sabine.
Flood Fill with your foreground color.
Keep selected.
Effects>Textures Effects>Textures - sélectionner la texture texture3_Bella, with these settings.

Selections>Select None.
10. Effects>3D Effects>Drop Shadow.
11. Again activate the top layer.
Open the tube Bella_Gr-Sabine and go to Edit>Copy.
Go back to your work and go to Edit>Paste as new layer.
Image>Resize, to 80%, resize all layers not checked.
Effects>Image Effects>Offset.
Layers>Duplicate.
Layers>Merge>Merge down.
Layers>Arrange>Move down - 4 times
Selections>Load/Save Selection>Load Selection from Disk.
Load again the selection Bella 3_Gr-Sabine.
Selections>Invert.
Press CANC on the keyboard 
Selections>Select None.
Layers>Merge>Merge down.
For my exemple, I moved the layer a little down.
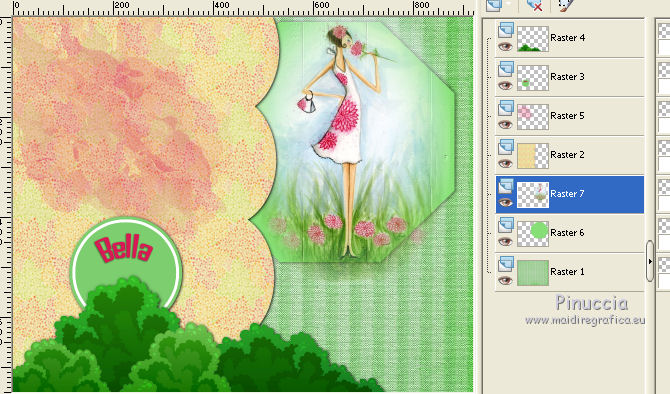
12. Activate the layer Raster 2 (the layer with Waves).
Open the tube Bella Gr-sabine and go to Edit>Copy.
Go back to your work and go to Edit>Paste as new layer (Raster 7).
Move  the tube a bit to the left. the tube a bit to the left.
Effects>3D Effects>Drop Shadow.

Layers>Duplicate.
Effects>Image Effects>Offset.
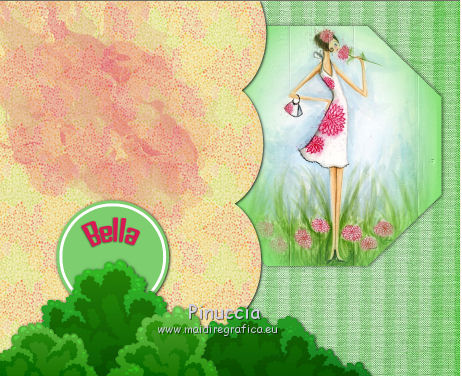
13. Layers>Merge>Merge All.
Effects>Plugins>AAA Frames - Texture Frame.
Sign your work on a new layer.
Save as jpg.
The tubes of this version are by Guismo
Your versions. Thanks

Marie
If you have problems or doubts, or you find a not worked link, or only for tell me that you enjoyed this tutorial, write to me.
9 January 2016
|