|
TOP JOYEUX NOÊL
 english version english version

This tutorial was created with PSPX8 and translated with Corel X3, but it can also be made using other versions of PSP.
Since version PSP X4, Image>Mirror was replaced with Image>Flip Horizontal,
and Image>Flip with Image>Flip Vertical, there are some variables.
In versions X5 and X6, the functions have been improved by making available the Objects menu.
In the latest version X7 command Image>Mirror and Image>Flip returned, but with new differences.
See my schedule here
Italian translation here
French translation here
For this tutorial, you will need:
Material here
Tocha24723.pspimage
Tube BarbiPink 06nav.psp
GradienteJoyeuxNoelSui.jpg
DecoSui2.png
seleccionsuijoyeuxnoel-6.PspSelection
(The links of the tubemakers here).
Plugins
consult, if necessary, my filter section here
Filters Unlimited 2.0 here
Balder Olrik - Prepare for Web here
Alien Skin Eye Candy 5 Impact - Perspective Shadow, Motion Trail here
Alien Skin Xenofex 2 - Constellation here
Mura's Meister - Copies here
Mura's Meister - Perspective Tiling here
Nik Software - Color Efex Pro here
Filters Balder Olrik can be used alone or imported into Filters Unlimited.
(How do, you see here)
If a plugin supplied appears with this icon  it must necessarily be imported into Unlimited it must necessarily be imported into Unlimited
Animation Shop

You can change Blend Modes and opacity of the layer, according to your colors.
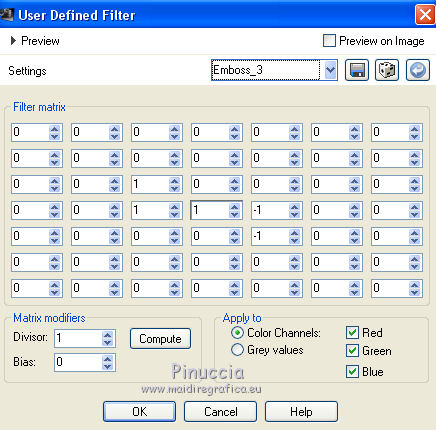
Copy the preset Emboss 3 in the Presets Folder.
Copy the Gradient in the Gradients Folder.
Copy the Selection in the Selections Folder.
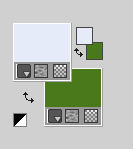
1. Set your foreground color to #e5ebf7,
and your background color to #49791c.
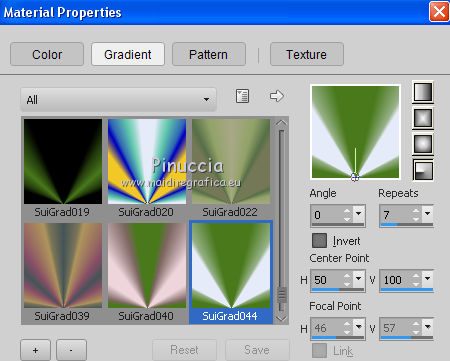
2. Set your foreground color to Gradient and select the gradient SuiGrad044, style Radial.
if you use other colors, also the gradient will change color
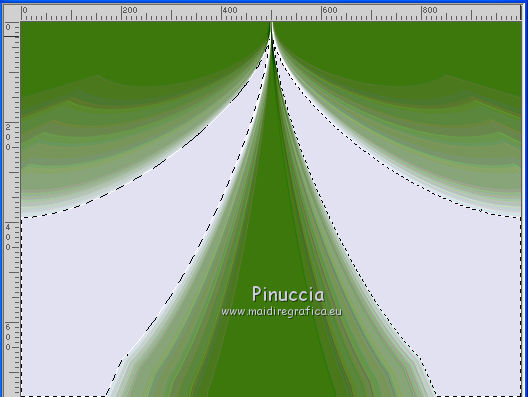
3. Open a new transparent image 1000 x 750 pixels.
Flood Fill  the transparent image with your Gradient. the transparent image with your Gradient.
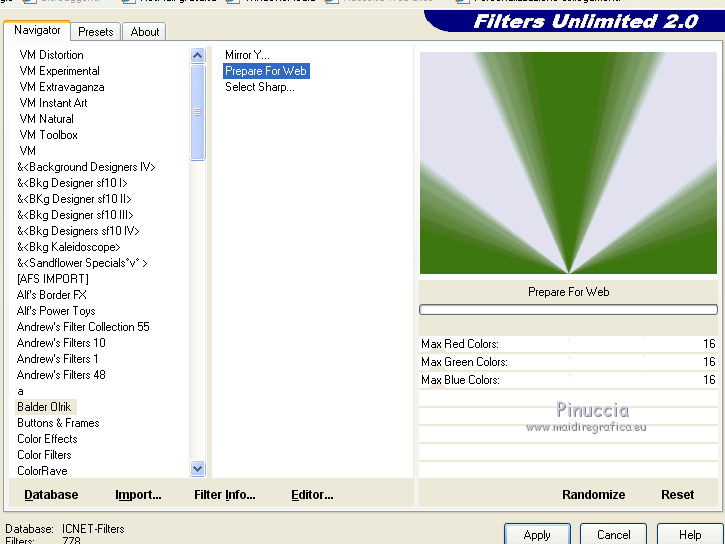
4. Effects>Plugins>Filters Unlimited 2.0 - Balder Olrik - Prepare for Web.
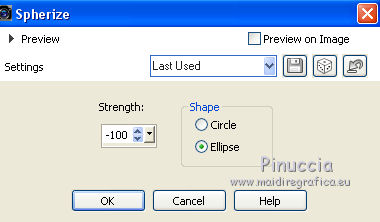
5. Effects>Geometric Effects>Spherize.
6. Effects>User Defined Effects - select the preset Emboss 3 and ok.
7. Image>Flip.
8. Layers>Duplicate.
9. Activate the Magic Wand Tool 

click on the light spaces to select them
Press CANC on the keyboard 
The result is covered by the bottom layer; if you close the layer, you can see the result
(if you close the layer, don't forget to open it again)

10. Selections>Select None.
11. You are on the top layer.
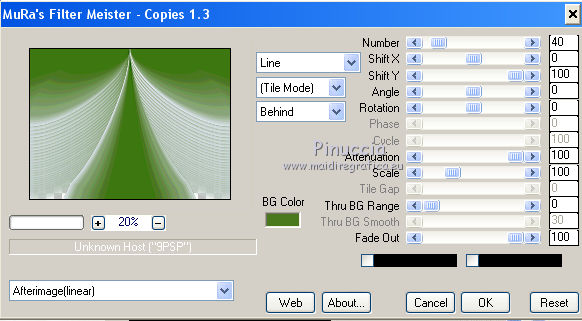
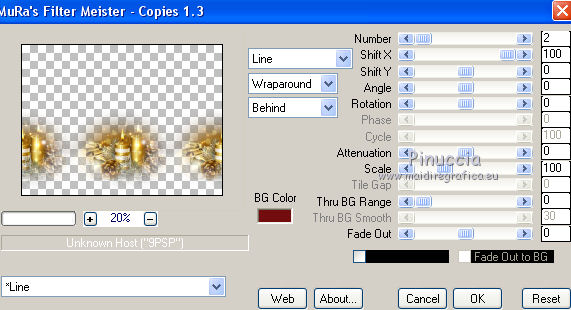
Effects>Plugins>Mura's Meister - Copies.
12. Open the tube bigth_246.png and go to Edit>Copy.
Go back to your work and go to Edit>Paste as New Layers.
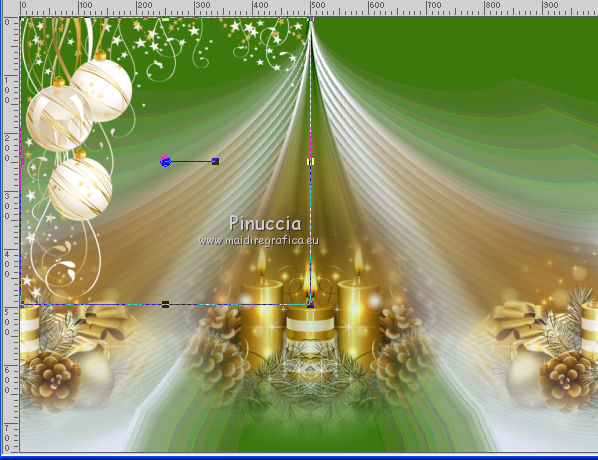
13. Objects>Align>Bottom
if you are using a previous version that has not available the menu Objects,
use the Move Tool  to move the tube at the bottom to move the tube at the bottom
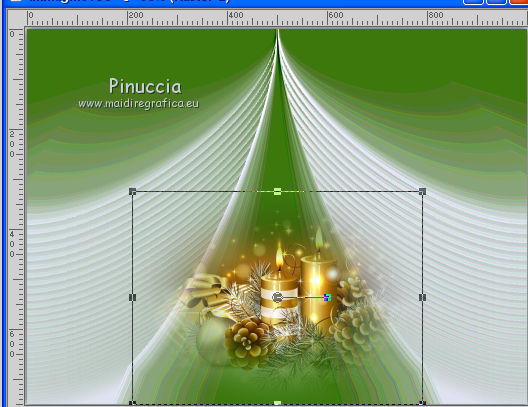
14. Effects>Plugins>Mura's Meister - Copies.
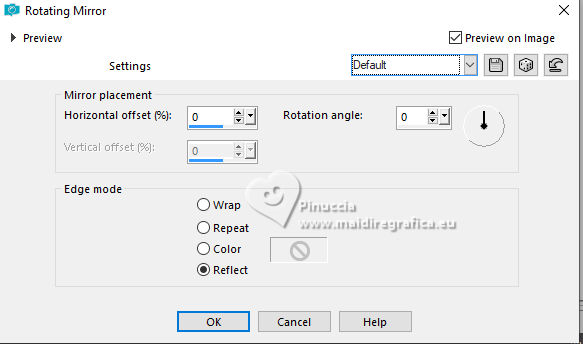
15. Effects>Reflection Effects>Rotating Mirror, default settings.
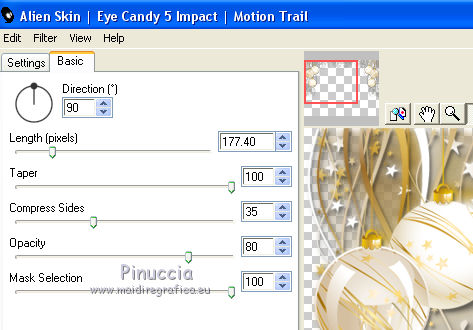
16. Effects>Plugins>Alien Skin Eye Candy 5 Impact - Motion Trail.
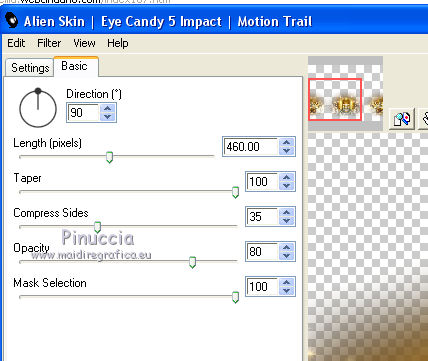
Reduce the opacity of this layer to 85%.
17. Open the tube Decor-0_961f1_3eb34895_L.png and go to Edit>Copy.
Go back to your work and go to Edit>Paste as New Layers.
18. Objects>Align>Top and after Objects>Align>Left
if you're working with a previous version that has not available the menu Objects,
use the Move Tool to move the tube at the upper left.
19. Layers>Duplicate.
Image>Mirror.
Layers>Merge>Merge Down.
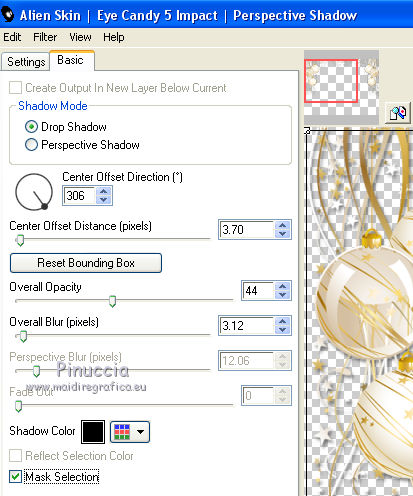
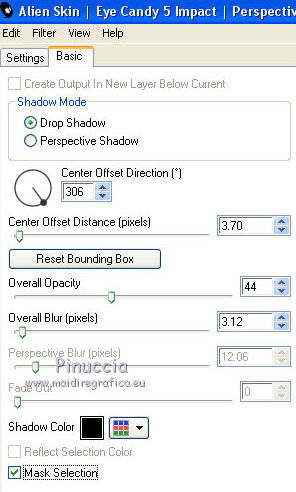
20. Effects>Plugins>Alien Skin Eye Candy 5 Impact - Perspective Shadow.
21. Effects>Plugins>Alien Skin Eye Candy 5 Impact - Motion Trail.
22. Open the tube DecoSui2.png and go to Edit>Copy.
Go back to your work and go to Edit>Paste as New Layers.
23. Effects>Plugins>Alien Skin Eye Candy 5 Impact - Perspective Shadow, same settings.
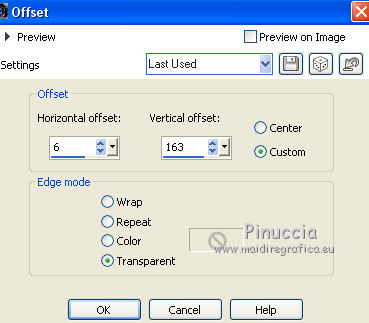
24. Effects>Image Effects>Offset.
25. Change the Blend Mode of this layer to Hard Light.
26. Layers>Duplicate.
Image>Mirror.
27. Open the tube Tocha24723.pspimage and go to Edit>Copy.
Go back to your work and go to Edit>Paste as New Layers.
Image>Resize, to 80%, resize all layers not checked.
Image>Mirror.
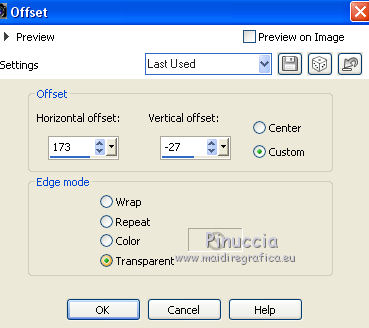
28. Effects>Image Effects>Offset.
29. Effects>Plugins>Alien Skin Eye Candy 5 Impact - Perspective Shadow, same settings.
30. Layers>Merge>Merge visible.
31. Open the tube DecoWordSui/Joyeux Noël1 and go to Edit>Copy.
Go back to your work and go to Edit>Paste as New Layers.
Move the tube at the bottom left.
Open the tube DecoWordSui/Joyeux Noël2 and go to Edit>Copy.
Go back to your work and go to Edit>Paste as New Layers.
Layers>Duplicate.
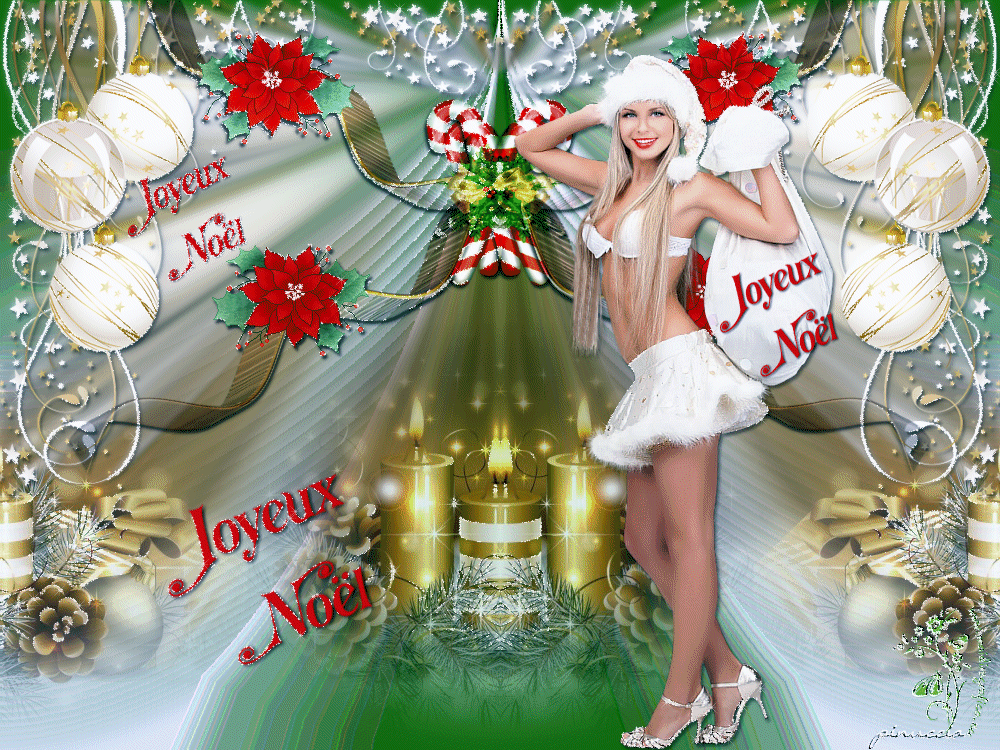
Move the texts where you like better, or see my example.
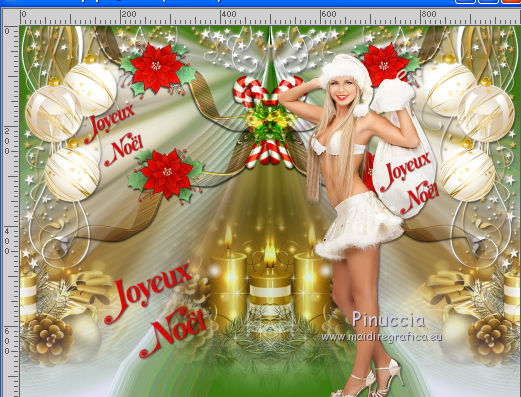
32. Sign your work on a new layer.
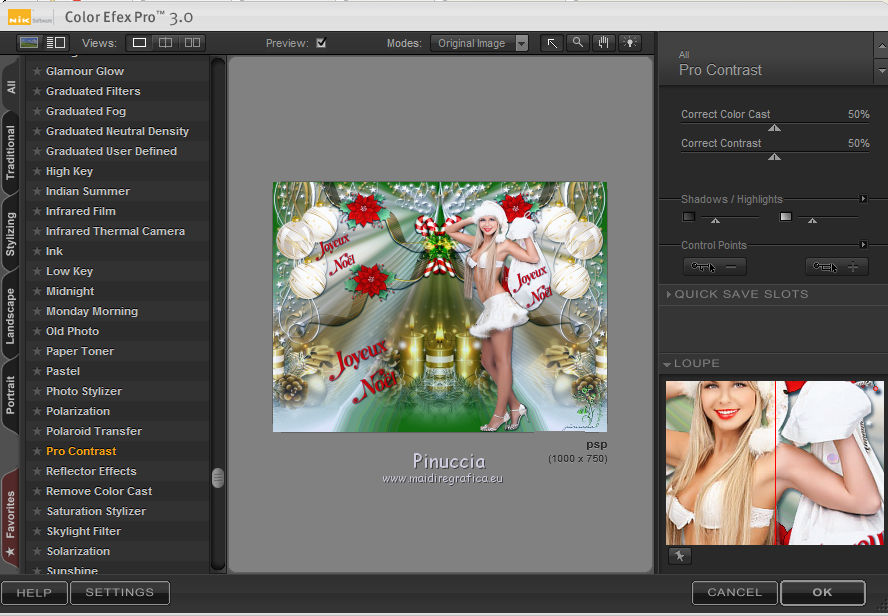
33. Effects>Plugins>Nik Software - Color Efex - Pro Contrast.
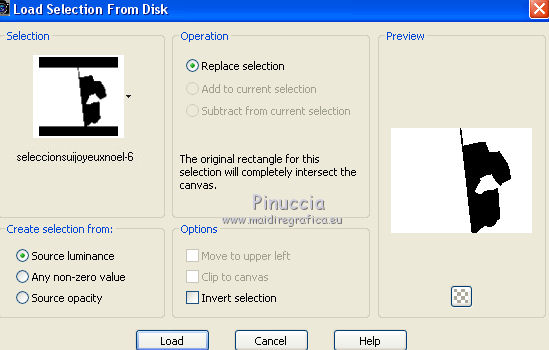
34. Selections>Load/Save Selection>Load Selection from disk.
Look for and load the selection seleccionsuijoyeuxnoel-6.PspSelection.
35. Layers>Duplicate - 2 time and you'll get 3 layers.
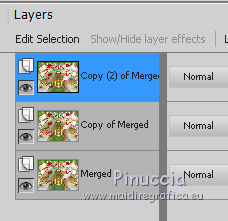
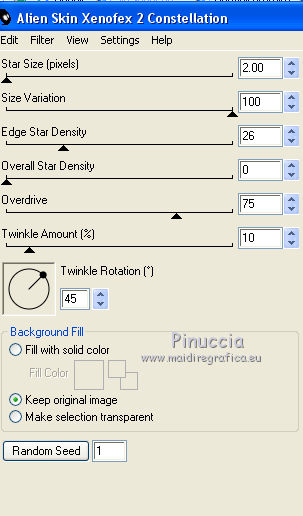
36. Keep selected the second copy layer.
Effects>Plugins>Alien Skin Xenofex 2 - Constellation
37. Activate the layer below of the first copy.
Effects>Plugins>Alien Skin Xenofex 2 - Constellation - Random Seed 5135 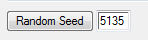 and ok. and ok.
38. Activate the bottom layer of the original.
Effects>Plugins>Alien Skin Xenofex 2 - Constellation - Random Seed 9994 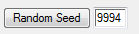 and ok. and ok.
if you prefer, you can simply click on Random Seed and ok
39. Selections>Select None.
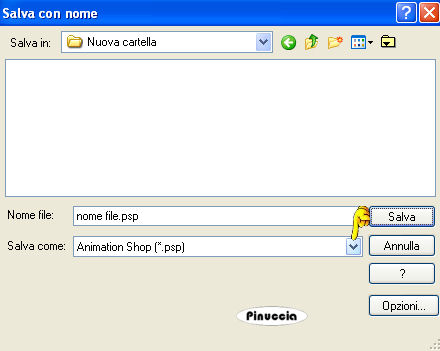
40. Save your work as Animation Shop psp
41. Open Animation Shop and open the image you save before
and you'll have an animation composed by 3 frames, frame delay 10
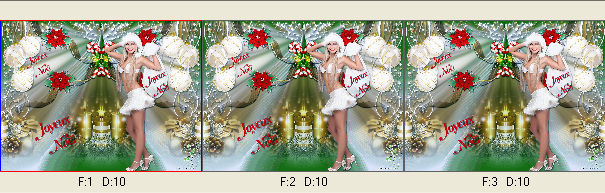
42. Keep the Frame delay to 10.
Check your result clicking on Visualize 
and save as gif
If you have problems or doubt, or you find a not worked link, or only for tell me that you enjoyed this tutorial, write to me.
12 November 2017
|