|
FRIENDS


Thanks Elaine for your invitation to translate your tutorials into english

This tutorial was written with PSP2020 and translated with PSPX9 and PSP2020, but it can also be made using other versions of PSP.
Since version PSP X4, Image>Mirror was replaced with Image>Flip Horizontal,
and Image>Flip with Image>Flip Vertical, there are some variables.
In versions X5 and X6, the functions have been improved by making available the Objects menu.
In the latest version X7 command Image>Mirror and Image>Flip returned, but with new differences.
See my schedule here
 italian translation here italian translation here
For this tutorial, you will need:
1 tube
1 deco tube.
The rest of the material

(The links of the tubemakers here).

consult, if necessary, my filter section here
AAA Frames - Foto Frame here

You can change Blend Modes according to your colors.
In the newest versions of PSP, you don't find the foreground/background gradient (Corel_06_029).
You can use the gradients of the older versions.
The Gradient of CorelX here

Open the mask in PSP and minimized them with the rest of the material.
1. Open a new transparent image 900 x 600 pixels.
2. Choose two colors from your material; for the example:
foreground color #56708b,
background color to #f5b68d
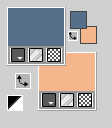
3. Set your foreground color to a Foreground/Background Gradient, style Linear.

4. Flood Fill  the transparent image with your light background color #f5b68d. the transparent image with your light background color #f5b68d.
5. Layers>New Raster Layer.
Flood Fill  the layer with your gradient. the layer with your gradient.
6. Layers>New Mask layer>From image
Open the menu under the source window and you'll see all the files open.
Select the mask Mask Natureza.
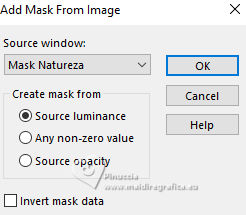
Effects>Edge Effects>Enhance More.
Layers>Merge>Merge Group.
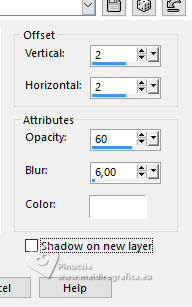
7. Effects>3D Effects>Drop Shadow, color white.
8. Layers>Merge>Merge All.
Edit>Copy
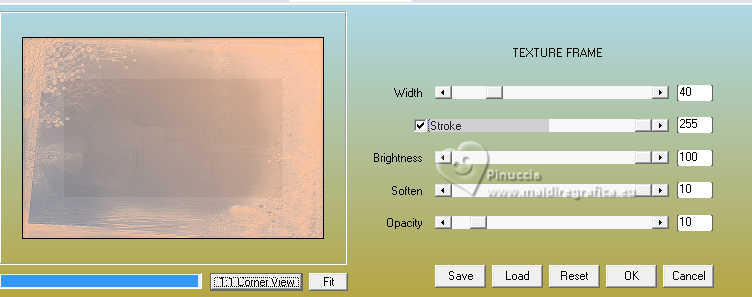
9. Effects>Plugins>AAA Frames - Texture Frames - 3 times with these settings.
10. Selections>Select All.
Image>Add Borders, 40 pixels, symmetric, whatever color.
Selections>Invert.
Edit>Paste into Selection - image in memory from step 8
11. Effects>3D Effects>Drop Shadow, color black.
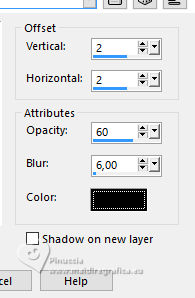
Repeat Drop Shadow, vertical and horizontal -2.
Selections>Select None.
12. Set your foreground color to white.
Layers>New Raster Layer.
Flood Fill  the layer with color white. the layer with color white.
14. Layers>New Mask layer>From image
Open the menu under the source window
and select the mask Mask Jolanta Malicka
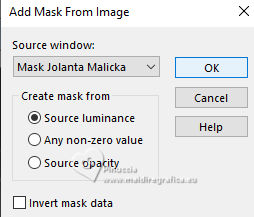
Effects>Edge Effects>Enhance More.
Layers>Merge>Merge Group.
15. Open your tube and go to Edit>Copy.
Go back to your work and go to Edit>Paste as new layer.
Image>Resize, if necessary, resize all layers not checked.
Place  il tube to your liking. il tube to your liking.
Effects>3D Effects>Drop Shadow, at your choice.
16. Open Frase Friends 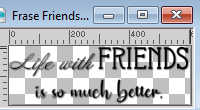
Edit>Copy.
Go back to your work and go to Edit>Paste as new layer.
Move  the text at the upper right. the text at the upper right.
(Author's Note: Please do not change anything in this text.
Please respect my work.)
17. Open your deco tube and go to Edit>Copy.
Go back to your work and go to Edit>Paste as new layer.
Image>Resize, if necessary, resize all layers not checked.
Place  the tube to your liking. the tube to your liking.
Effects>3D Effects>Drop shadow, at your choice.
18. Image>Add Borders, 2 pixels, symmetric, color black.
Image>Add Borders, 10 pixels, symmetric, color #fad3ba, or a color at your choice.
Image>Add Borders, 2 pixels, symmetric, color black.
19. Sign your work and save as jpg.
For the tubes of this version thanks Elaine.


Your versions. Thanks

Tosca dei gatti


If you have problems or doubts, or you find a not worked link, or only for tell me that you enjoyed this tutorial, write to me.
25 August 2025

|

