|
THE MIRACLE OF RESURRECTION  
 The resurrection is the eternal reminder that, even in the longest nights, morning always comes.
Love has won. Life goes on. And hope never dies.
This tutorial was written with Psp2022 and translated with PspX2020, but it can also be made using other versions of PSP.
For this tutorial, you will need:  For the tubes and the mask thanks PqnaAlice and Narah. (The links of the tubemakers here).  consult, if necessary, my filter section here Filters Unlimited 2.0 here &<Bkg Designer sf10II> - DIS Warp (Vertical) (to import in Unlimited) here Alien Skin Eye Candy 5 Impact - Perspective Shadow here Flaming Pear - Flexify 2 here Penta.com - Jeans here VM Natural - Splash here Mura's Meister - Copies here Xero - Tekstya here Filters Penta.com and VM Natural can be used alone or imported into Filters Unlimited. (How do, you see here) If a plugin supplied appears with this icon  it must necessarily be imported into Unlimited it must necessarily be imported into Unlimited You can change Blend Modes according to your colors. In the newest versions of PSP, you don't find the foreground/background gradient (Corel_06_029). You can use the gradients of the older versions. The Gradient of CorelX here  Copy the Selections in the Selections Folder. Open the mask in PSP and minimize it with the rest of the material. 1. Choose 3 color to work. For the example:  Set your foreground color to color 2 #b17711, and your background color to color 3 #fffae4. Color 1: #1d0600 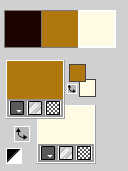 2. Set your foreground color to a Foreground Background Gradient, style Sunburst. 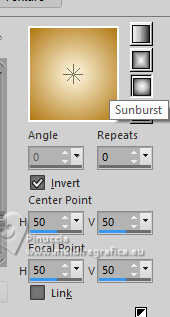 Open a new transparent image 950 x 700 pixels. Flood Fill  the transparent image with your Gradient. the transparent image with your Gradient.3. Effects>Plugins>VM Natural - Splash. 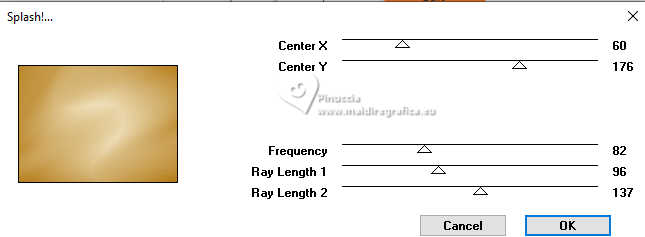 4. Effects>Plugins>Filters Unlimited 2.0 - &<Bkg Designer sf10I> - DIS Warp (Vertical), default settings 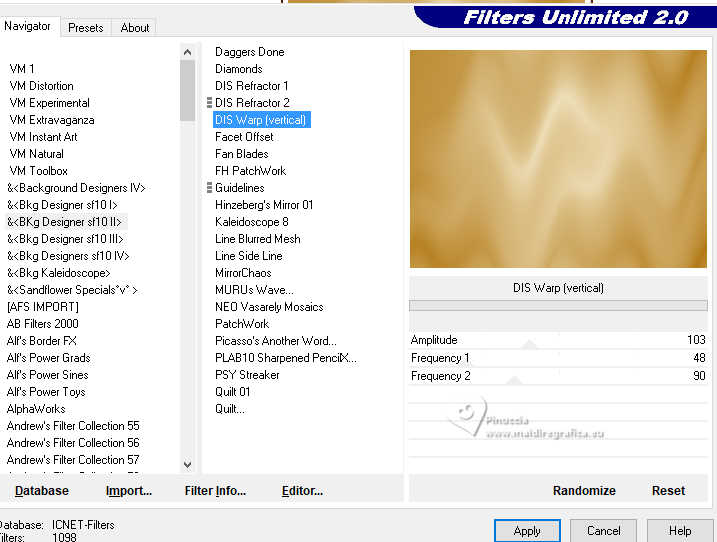 5. Layers>Duplicate. Close this layer, Copy of Raster 1. Activate the layer below, Raster 1. Effects>Plugins>Xero - Tekstya 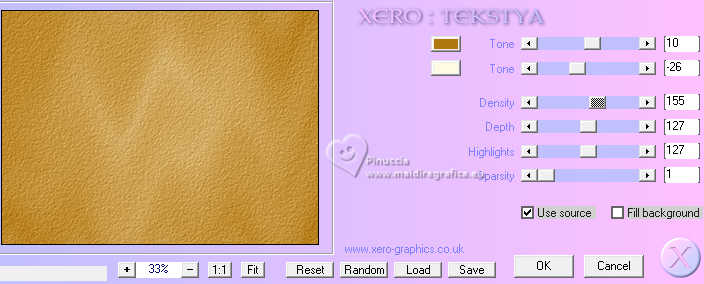 6. Layers>New Raster Layer. Set your foreground color to color 1 #1d0600 Selections>Select All. Selections>Modify>Contract - 3 pixels. Press CANC on the keyboard  Selections>Select None. Effects>Plugins>Alien Skin Eye Candy 5 Impact - Perspective Shadow.  7. Open and activate the layer Copy of Raster 1. Image>Resize, to 85%, resize all layers not checked. Activate your Magic Wand Tool  , tolerance and feather 0, , tolerance and feather 0,and click in the transparent part to select it. 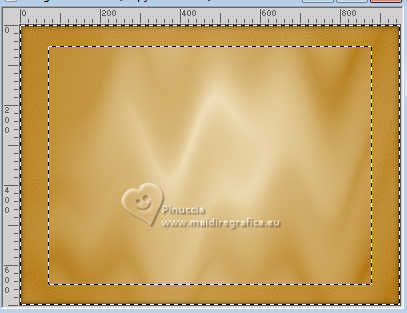 Selections>Invert. 8. Layers>New Raster Layer. Flood Fill le calque avec la couleur d'avant plan (color 1 #1d0600)Selections>Modify>Contract - 5 pixels. Press CANC on the keyboard. Selections>Select None. Effects>Plugins>Alien Skin Eye Candy 5 Impact - Perspective Shadow.  9. Activate the layer below, Copy of Raster 1. Layers>New Raster Layer. Selections>Select All. Open the misted 051PascoaByPqnaAlice 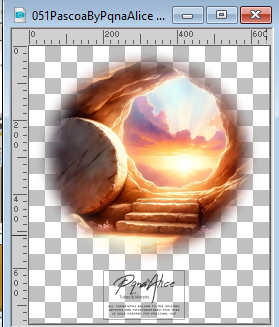 Erase the watermark and go to Edit>Copy. Go back to your work and go to Edit>Paste Into Selection. Selections>Select None. Effects>Image Effects>Seamless Tiling, default settings  Adjust>Blur>Gaussian Blur - radius 30. 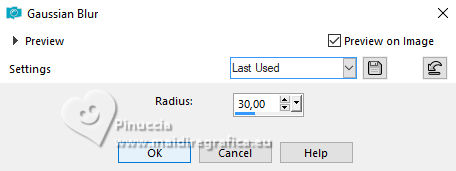 10. Activate the layer Copy of Raster 1. Activate your Magic Wand Tool , tolerance and feather 0,and click in the transparent part to select it.  Activate the layer Raster 4. Press CANC on the keyboard. remember that you have the misted in memory, which you will have to use again. Do not use Edit>Cut because this command deletes previous images from memory. Selections>Select None. 11. Layers>Duplicate - 3 times.  12. Close the layers of the copies - Copy of Raster 4, Copy (2) of Raster 4 and Copy (3) of Raster 4. Activate the layer original, Raster 4. Effects>Plugins>Penta.com - Jeans. 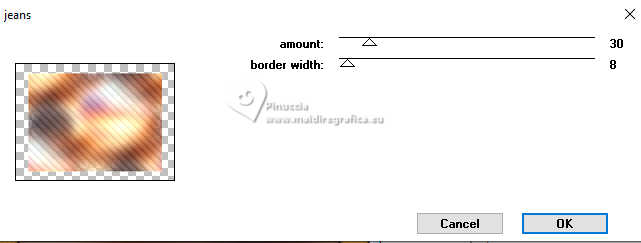 Layers>Properties>General>Blend Mode: Overlay. 13. Open and activate the layer of the first copy: Copy of Raster 4. Effects>Geometric Effects>Perspective - Horizontal 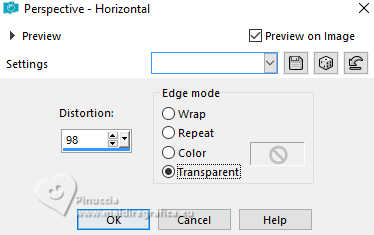 Repeat Effects>Geometric Effects>Perspective - Horizontal -98, 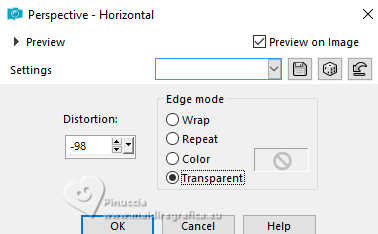  Effects>Plugins>Flaming Pear - Flexify 2. 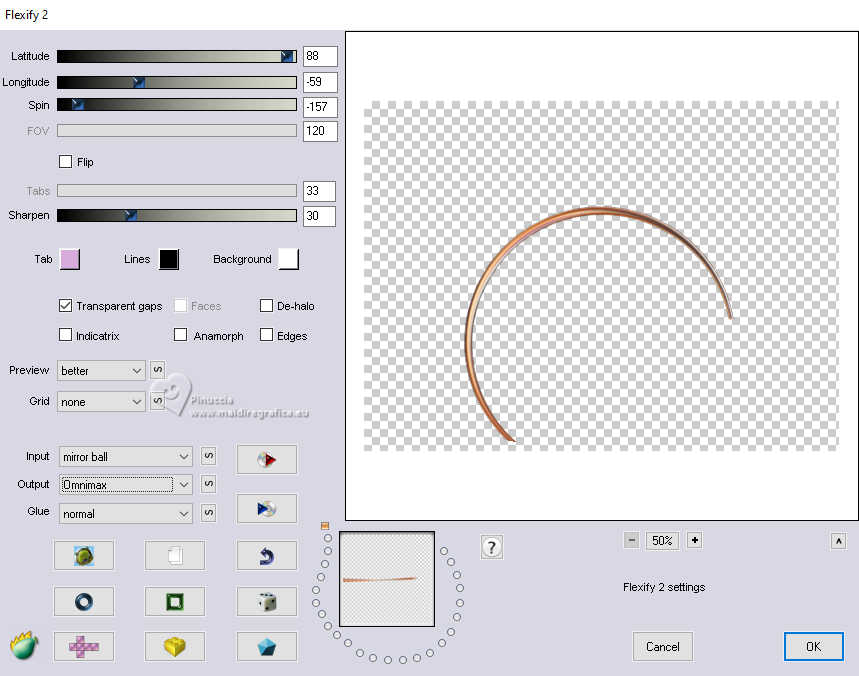 14. Image>Resize, 70%, resize all layers not checked. Effects>Plugins>Mura's Meister - Copies.  Selections>Load/Save Selections>Load Selection From disk. Look for and load the selection TMOR_Xixi1 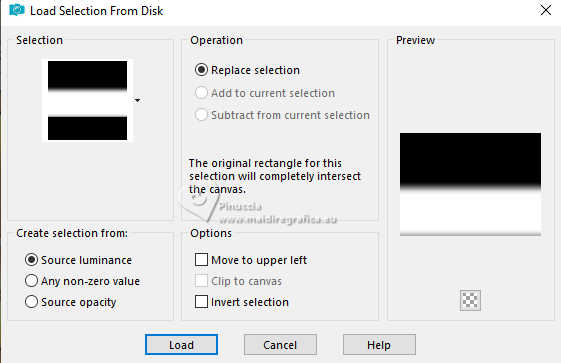 Press CANC on the keyboard. Selections>Select None. 15. Effects>Distortion Effects>Polar Coordinates 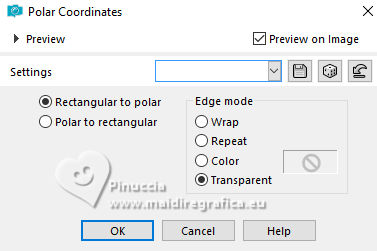 Adjust>Sharpness>Sharpen. 16. Effects>Plugins>Alien Skin Eye Candy 5 Impact - Perspective Shadow. 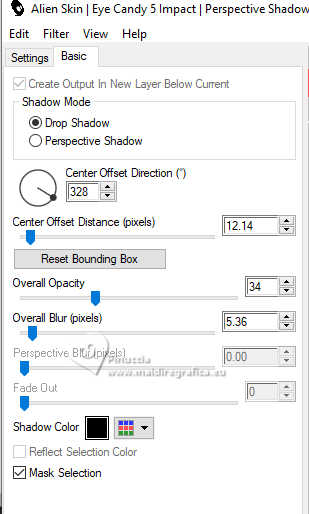 17. Activate the layer Raster 4. Layers>New Raster Layer. Selections>Load/Save Selections>Load Selection From disk. Look for and load the selection TMOR_Xixi2. 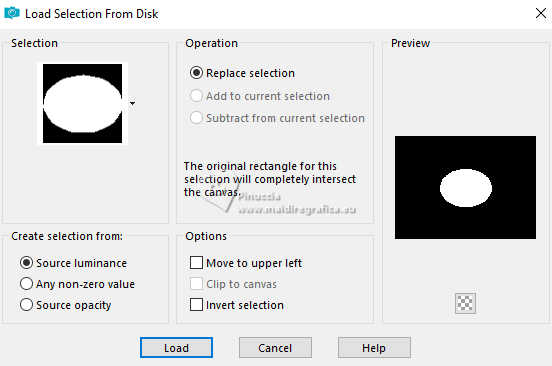 The misted 051PascoaByPqnaAlice is still in memory: Edit>Paste Into Selection. Adjust>Sharpness>Sharpen. Selections>Select None. 18. Activate the layer Copy of Raster 4. Layers>Merge>Merge Down. Layers>Properties>General>Blend Mode: Multiply. Pick Tool  Position X: 76,00 - Position Y: 220,00 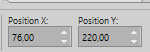 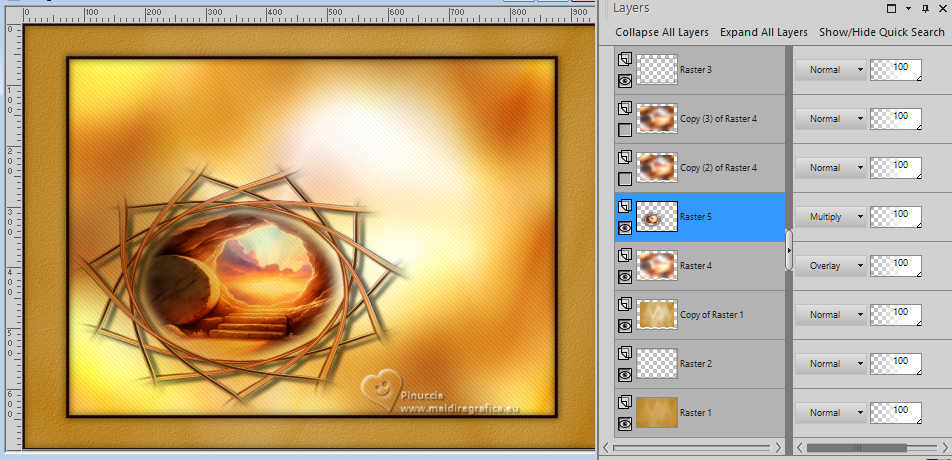 19. Open and activate the layer Copy (2) of Raster 4. Layers>New Mask layer>From image Open the menu under the source window and you'll see all the files open. Select the mask NarahsMasks_1512 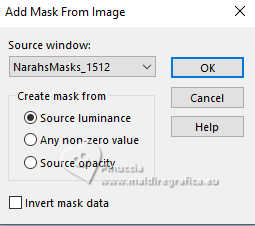 Layers>Merge>Merge Group. Image>Mirror>Mirror Horizontal. Image>Mirror>Mirror Vertical. Layers>Properties>General>Blend Mode: Dodge. Effects>3D Effects>Drop Shadow - Shadown on new Layer marcado. 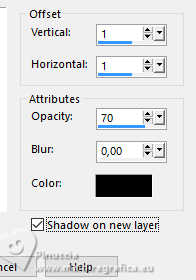 20. Open and activate the layer Copy (3) of Raster 4. Layers>Arrange>Send to Bottom. Layers>Arrange>Move Up. Effects>Image Effects>Seamless Tiling, default settings. Layers>Properties>General>Blend Mode: Dissolve, Opacity: 60%. 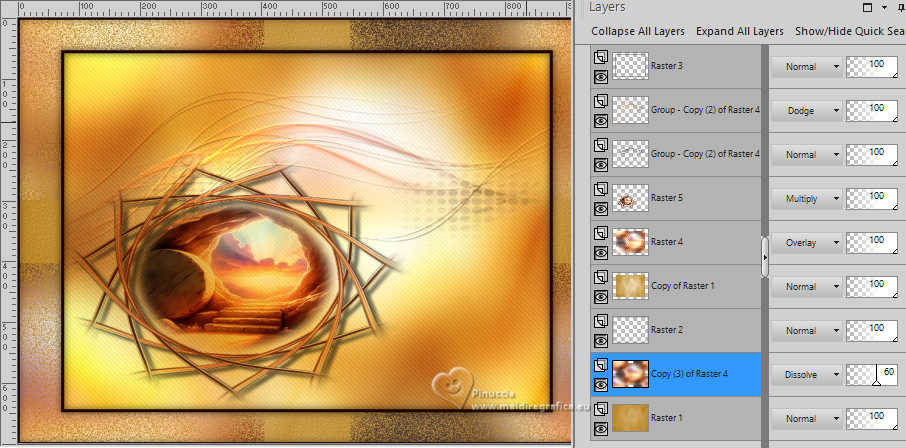 Activate your top layer, Raster 3. 21. Open the tube or misted of the personnage Pour l'exemple 052PascoaByPqnaAlice 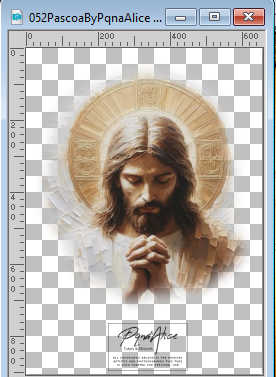 Erase the watermark and go Edit>Copy. Go back to your work and go to Edit>Paste as New Layer. Image>Resize, if necessary - for the supplied tube to 63%, resize all layers not checked. Move  the tube at the upper right, the tube at the upper right,or - for the supplied tube: Pick Tool Position X: 580,00 - Position Y: -47,00 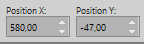 Layers>Properties>General>Blend Mode: Overlay. 22. Open TextoTMOR_Xiki 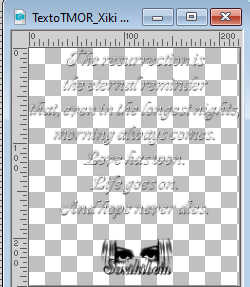 Erase the watermark and go to Edit>Copy. Go back to your work and go to Edit>Paste as New Layer. Pick Tool Position X: 622,00 - Position Y: 418,00  23. Open TituloTMOR_Xiki  Erase the watermark and go to Edit>Copy. Go back to your work and go to Edit>Paste as New Layer. Pick Tool Position X: 123,00 - Position Y: 4,00  24. Sign your work. Layers>Merge>Merge All and save as jpg. The tubes of this version are mine (from images du net)   Your versions. Thanks  Marion  Kika  Precieuse  Louise  If you have problems or doubts, or you find a not worked link, or only for tell me that you enjoyed this tutorial, write to me. 26 March 2025 |


