|
THE HEART OF CREATION  
 6 Years of Art, Affection, and Inspiration at SimPSP At the center of every stroke lives the soul of creation. Each color holds a dream, each detail, a touch of love. SimPSP is this haven — where art blossoms, and the heart of creators beats as one.
This tutorial was written with Psp2022 and translated with PspX2020, but it can also be made using other versions of PSP.
For this tutorial, you will need:  (The links of the tubemakers here).  consult, if necessary, my filter section here Filters Unlimited 2.0 here Penta.com - Jeans here Penta.com - Color dot here Mehdi - Wavy Lab 1.1. here Italian Editors Effects - Effetto Fantasma here Alien Skin Eye Candy 5 Impact - Backlight, Motion Trail here Filters Penta.com and Italian Editors can be used alone or imported into Filters Unlimited. (How do, you see here) If a plugin supplied appears with this icon  it must necessarily be imported into Unlimited it must necessarily be imported into Unlimited You can change Blend Modes according to your colors.  Copy the preset Emboss 5 in the Presets Folder. Copy the line amc beaded in the Styled Lines Folder. Copy the selections in the Selections Folder. 1. Choose 4 colors to work. For the example: 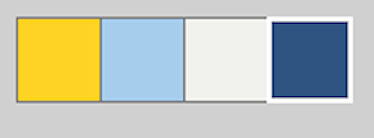 Set your foreground color to #ffd326, and your background color to #a7cdec  color 3 #f1f1ed color 4 #315481 2. Open a new transparent image 850 x 500 pixels. Sequence of colors: 1 - 2 - 3 - 4 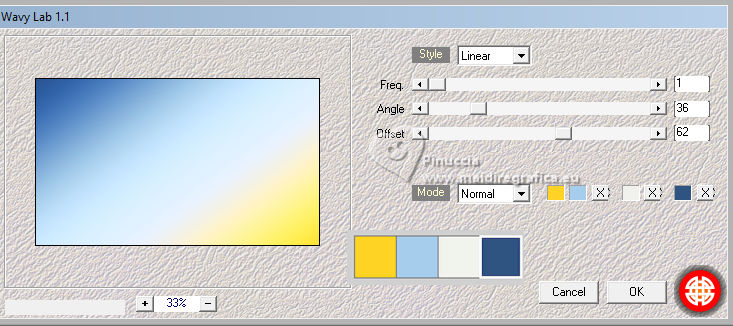 3. Effects>Plugins>Penta.com - Jeans, default settings. 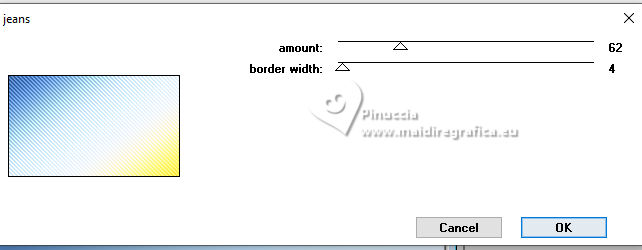 4. Layers>New Raster Layer. Selections>Load/Save Selections>Load Selection From Disk. Look for and load the selection 6Niver_Xiki1 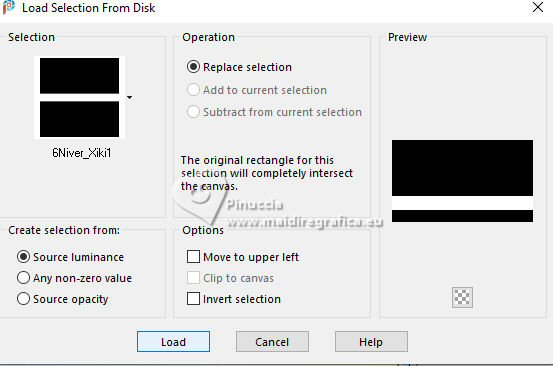 Set your foreground color to the color 4 #315481  Flood Fill  the selection with the foreground color (color 4) the selection with the foreground color (color 4)Selections>Select None. 5. Effects>Distortion Effects>Wave. 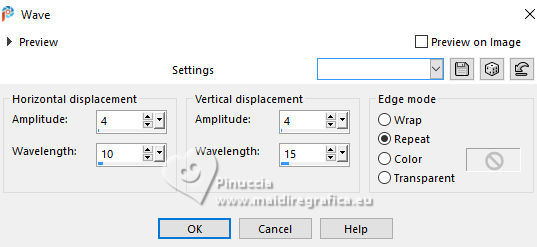 6. Effects>Plugins>Italian Editors Effect - Effetto Fantasma. 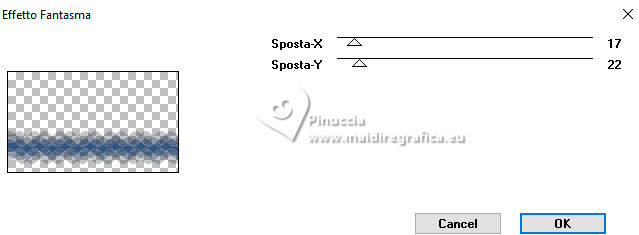 Layers>Duplicate. Image>Mirror>Mirror Vertical (Image>Flip). Layers>Merge>Merge Down. Layers>Properties>General>Opacity: 70%. 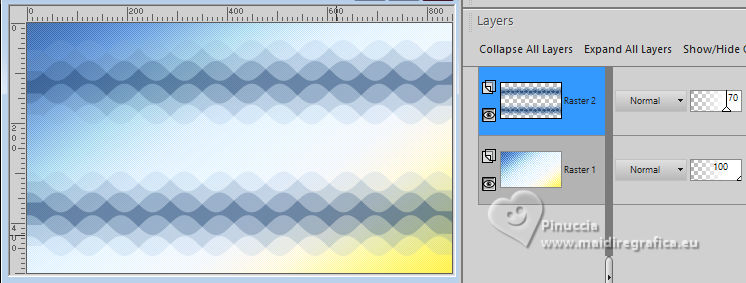 7. Effects>Image Effects>Seamless Tiling. 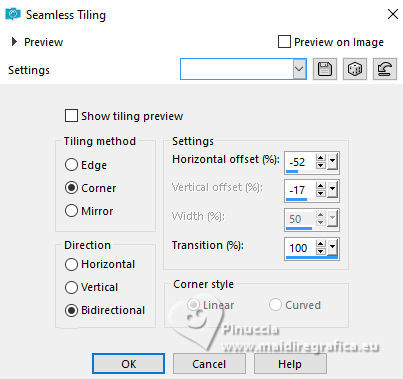 8. Effects>User Defined Filter - preset Emboss 5 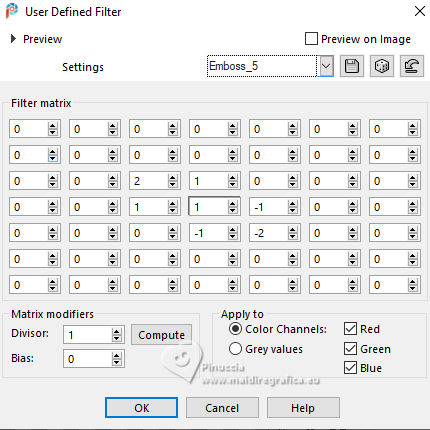 9. If you don't see the rulers, go to View Rulers 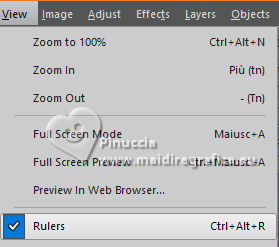 To create a Guide Line vertically at position 425, point the mouse anywhere on the vertical ruler, and when the cross appears 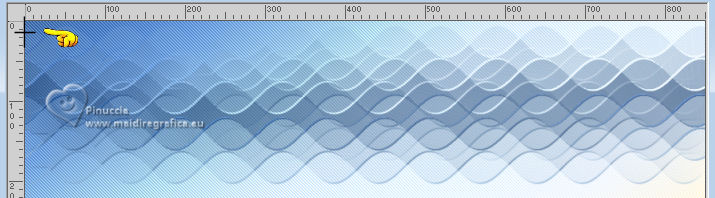 pull the line that appears (it will then turn blue) to the right, until 425 pixels at the bottom you can check the position  Then, to create two Guide Line horizontally at position 380 and 250 pixels point the mouse anywhere on the horizontal ruler, and when the cross appears 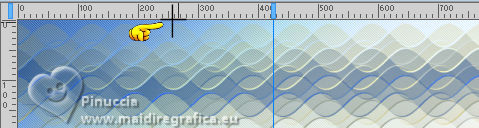 pull the line down until 380 pixels 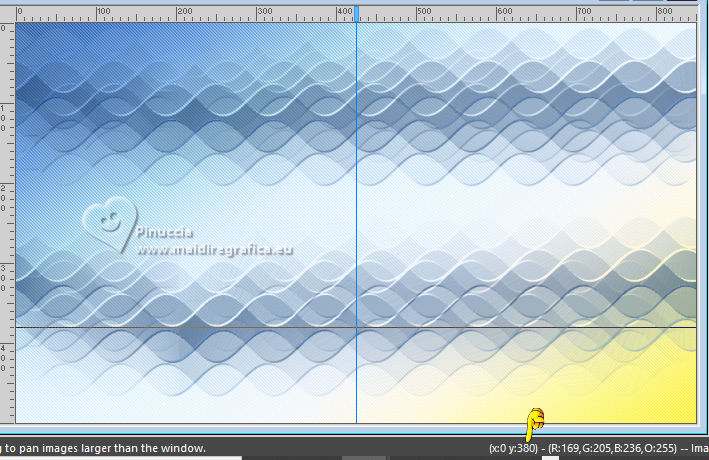 and again point the mouse as before, and pull a third until 250 pixels 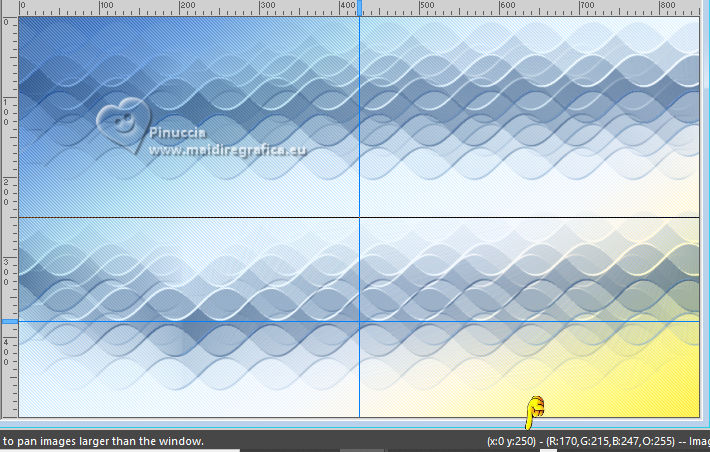 Note of the author: If you have any questions about how to use the Guide Lines, watch the Video here available on the channel, where I teach the step by step. This way, we will have marked the center of our work, which will make the next steps easier.  10. Activate your Ellipse Tool 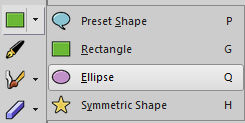 with these settings: with these settings:Line Style amc beaded  Set again your foreground color to the color 1 #ffd326, and your background color to the color 3 #f1f1ed 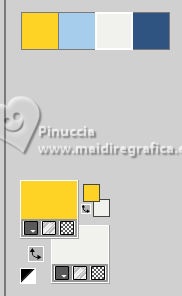 Point the mouse in the middle of the two central guide lines x425y250 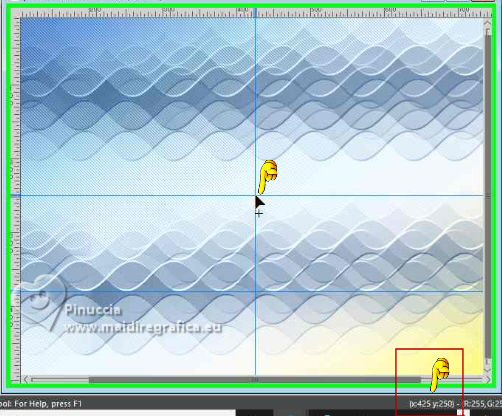 Press and drag CTRL key until you find the Guide line that is at position 380. 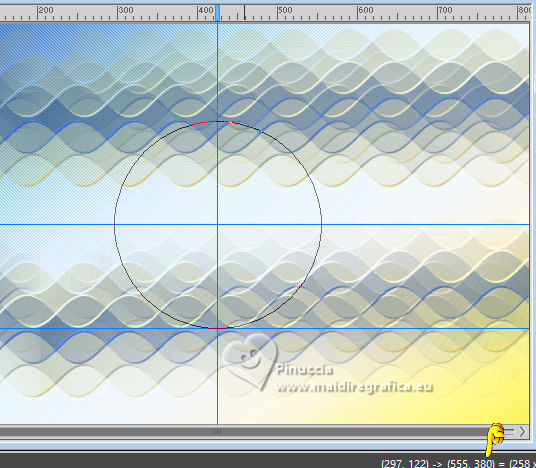 release the mouse button and you will have the ellipse  Layers>Convert to Raster Layer. Go to View>Guides  and you have this 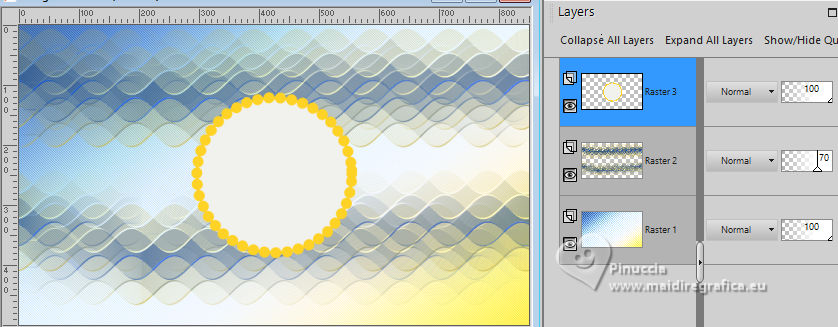 11. Activate your Magic Wand Tool  , tolerance and feather 0, , tolerance and feather 0,and click in the white part of the Ellipse. Open you flower image watercolor_flowers 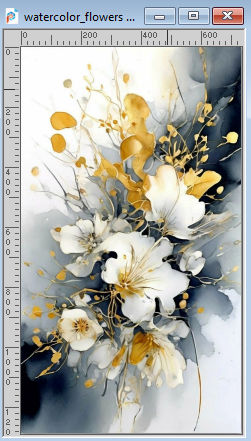 Edit>Copy. Go back to your work and go to Edit>Paste a New Layer. Image>Resize, if necessary - for me to 50%, resize all layers not checked. Place  the image on the selection to your liking. the image on the selection to your liking.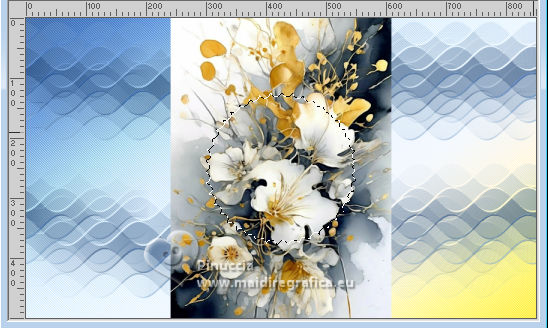 Adjust>Sharpness>Sharpen. Selections>Invert. Edit>Cut o press CANC on the keyboard  Selections>Select None. Layers>Merge>Merge Down. 12. Layers>New Raster Layer. Selections>Load/Save Selections>Load Selection From Disk. Look for and load the selection 6Niver_Xiki2 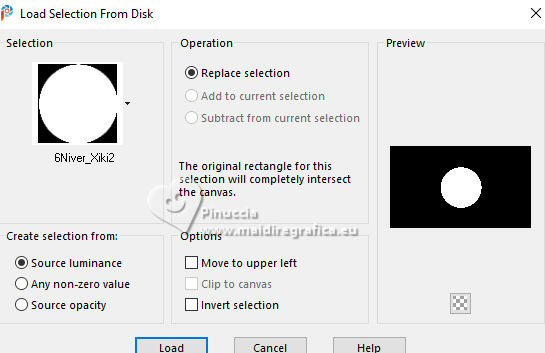 Effects>Plugins>Alien Skin Eye Candy 5 Impact - Backlight. 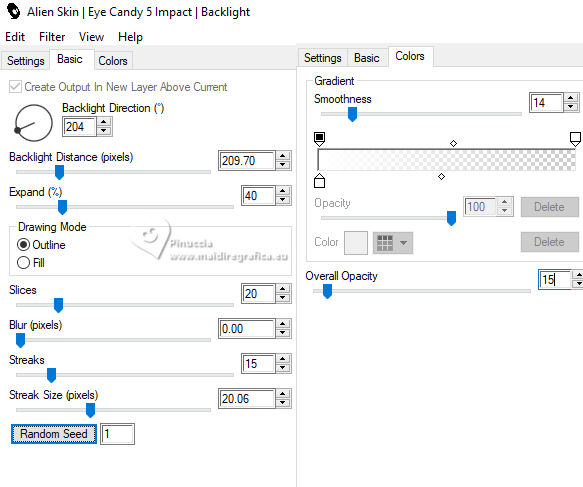 Layers>Arrange>Move Down. Selections>Select None. 13. Activate again your top layer, Raster 3. 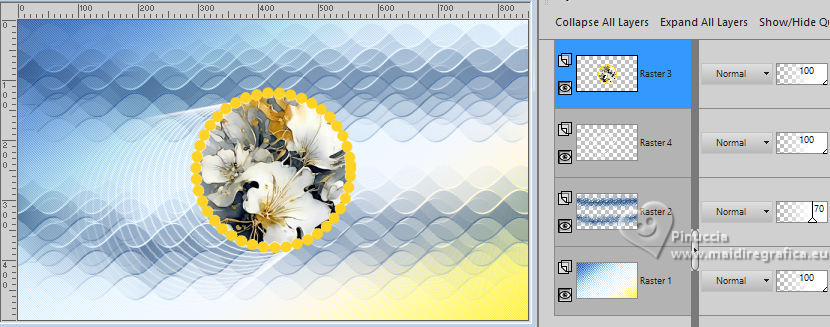 Effects>3D Effects>Drop Shadow, color black #000000. 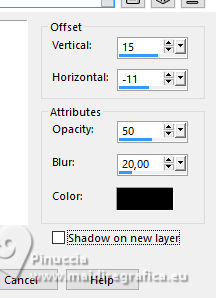 Layers>Duplicate. Close the layer Copy of Raster 3. 14. Activate the layer Raster 3. Layers>Merge>Merge Down. Pick Tool  Position X: 412,00 - Position Y: -41,00. 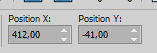 Crop Tool 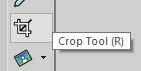 Click on Merged Opaque  and Apply.  15. Activate again your Ellipse Tool Line Style +Solid width 5  Keep your foreground color to the first color, and close your background color.  Move the cursor to the middle between the center guide lines, and drag to the bottom line.  16. Check the size and position of your ellipse to see if it is the same as mine. Click on Edit Mode to activate the values box; Radius X you can change the width and Radius Y you can change the height of your ellipse. Center X and Center Y you can change the position of the ellipse in your work.  Right click on the layers palette and Duplicate. Close the layer Copy of Vector 1. Activate the layer Vector 1. 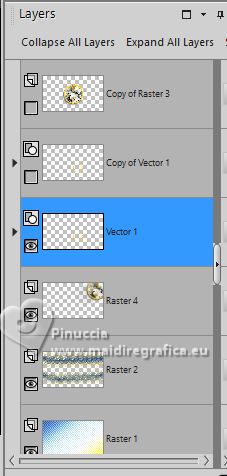 Layers>Convert to Raster Layer. 17. Objects>Align>Center in Canvas. Effects>Plugins>Alien Skin Eye Candy 5 Impact - Backlight, foreground color. In her second version Soxikibem used the color 4. 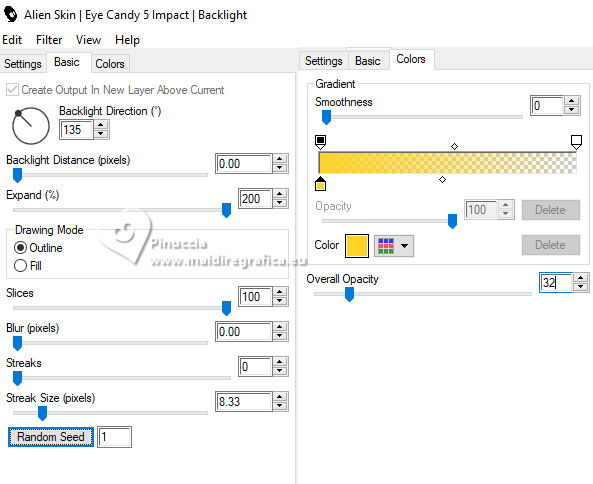 18. Pick Tool Position X: 310,00 - Position Y: 0,00. 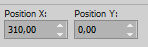 Layers>Arrange>Move Down. Effects>3D Effects>Drop Shadow, color 4 #315481, shadow on new layer checked 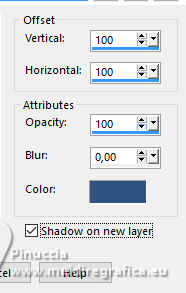 in her second version Soxikibem used the background color 19. Stay on the layer Raster 3, Shadow 1. Image>Resize, to 60%, resize all layers not checked. Pick Tool Position X: 445,00 - Position Y: 122,00. 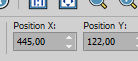 Adjust>Add/Remove Noise>Add Noise  Adjust>Sharpness>Sharpen More. 20. Open and activate the layer Copy of Vector 1. Activate the Ellipse Tool in the Layers bar, double-click on the New Ellipse layer. The Vector Property window will open. Change the Stroke color to color 4, change the Stroke width to 10.00, and click OK. 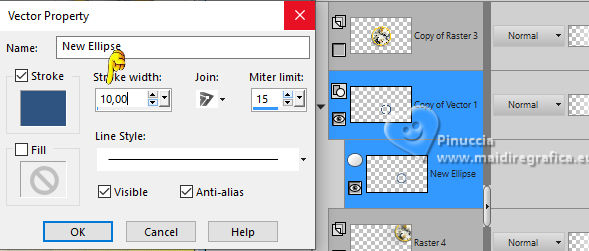 So we have changed the color and the width of the outline of our ellipse. 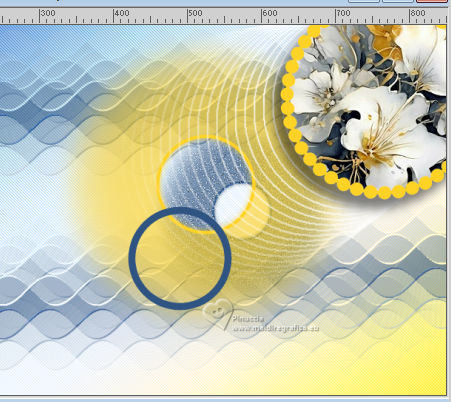 21. Now activate your Ellipse Tool and change Radius X and Y to 100 to increase the size of the Ellipse  Layers>Convert to Raster Layer. 22. Effects>Plugins>Alien Skin Eye Candy 5 Impact - Motion Trail. 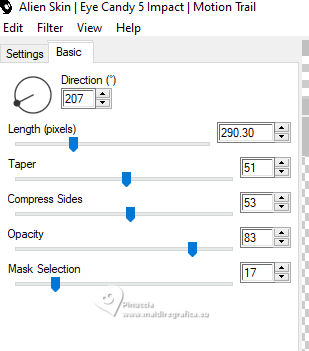 Pick Tool Position X: 226,00 - Position Y: 102,00.  23. Effects>Plugins>Penta.com - Color Dot.  Effects>Edge Effects>Enhance. Effects>3D Effects>Drop Shadow, color white #ffffff, shadow on new layer not checked.  24. Open and activate the layer Copy of Raster 3. Layers>Properties>General>Blend Mode: Luminance (L), Opacity: 40%. In her second version Soxikibem used Multiply. Layers>Move>Move Down - 5 times. The layer must be above the Raster 1 layer Pick Tool Position X: 147,00 - Position Y: 95,00.  Effects>Edge Effects>Enhance. 25. Activate your top layer. Open Decor6Years_Xiki1  Erase the watermark and go to Edit>Copy. Go back to your work and go to Edit>Paste as New layer. Pick Tool Position X: 0,00 - Position Y: 0,00.  26. Ouvrir Decor6Years_Xiki2  Erase the watermark and go to Edit>Copy. Go back to your work and go to Edit>Paste as New layer. Pick Tool Position X: 260,00 - Position Y: 60,00.  27. Open TituloTHOC_Xiki  Erase the watermark and go to Edit>Copy. Go back to your work and go to Edit>Paste as New Layer. Pick Tool Position X: 129,00 - Position Y: 274,00.  28. Open Decor6Years_Xiki3  Erase the watermark and go to Edit>Copy. Go back to your work and go to Edit>Paste as New Layer. Pick Tool Position X: 545,00 - Position Y: 243,00.  Layers>Properties>General>Blend Mode: Luminance (L). 29. Image>Add Borders, 2 pixels, symmetric, color 4 #315481. Image>Add Borders, 5 pixels, symmetric, background color #a7cdec. Image>Add Borders, 15 pixels, symmetric, color 3 #f1f1ed. Image>Add Borders, 5 pixels, symmetric, background color #a7cdec. Image>Add Borders, 2 pixels, symmetric, foreground color #ffd326. Image>Add Borders, 5 pixels, symmetric, background color #a7cdec. Image>Add Borders, 30 pixels, symmetric, color 3 #f1f1ed. Image>Add Borders, 2 pixels, symmetric, color 4 #315481. 30. Open Decor6Years_Xiki4  Erase the watermark and go to Edit>Copy. Go back to your work and go to Edit>Paste as New Layer. Pick Tool Position X: 120,00 - Position Y: 24,00.  31. Layers>Duplicate. Image>Mirror>Mirror Horizontal. Image>Mirror>Mirror Vertical (Image>Flip). 32. Open TutorialBySoxikibem  Edit>Copy. Go back to your work and go to Edit>Paste as New Layer. Pick Tool Position X: 684,00 - Position Y: 557,00  Open Translation Pinuccia  Edit>Copy. Go back to your work and go to Edit>Paste as New Layer. Place to your liking.33. Sign your work and save as jpg.   Your versions. Thanks  Louise  Marion  Jolcsi  Monique  If you have problems or doubts, or you find a not worked link, or only for tell me that you enjoyed this tutorial, write to me. 23 June 2025 |


