|
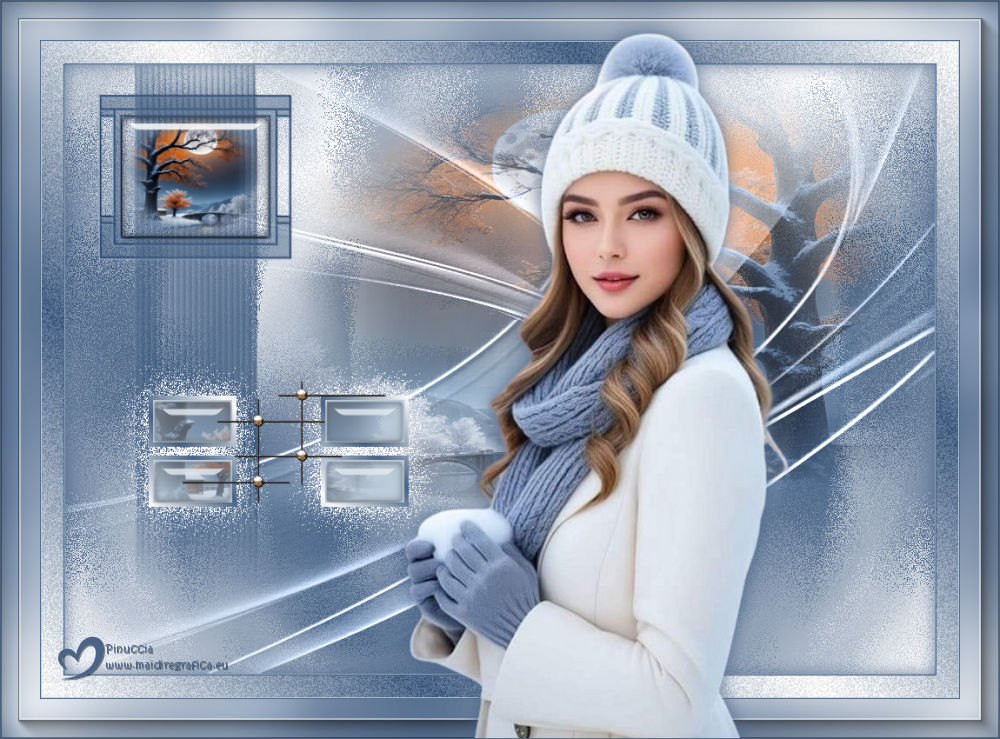
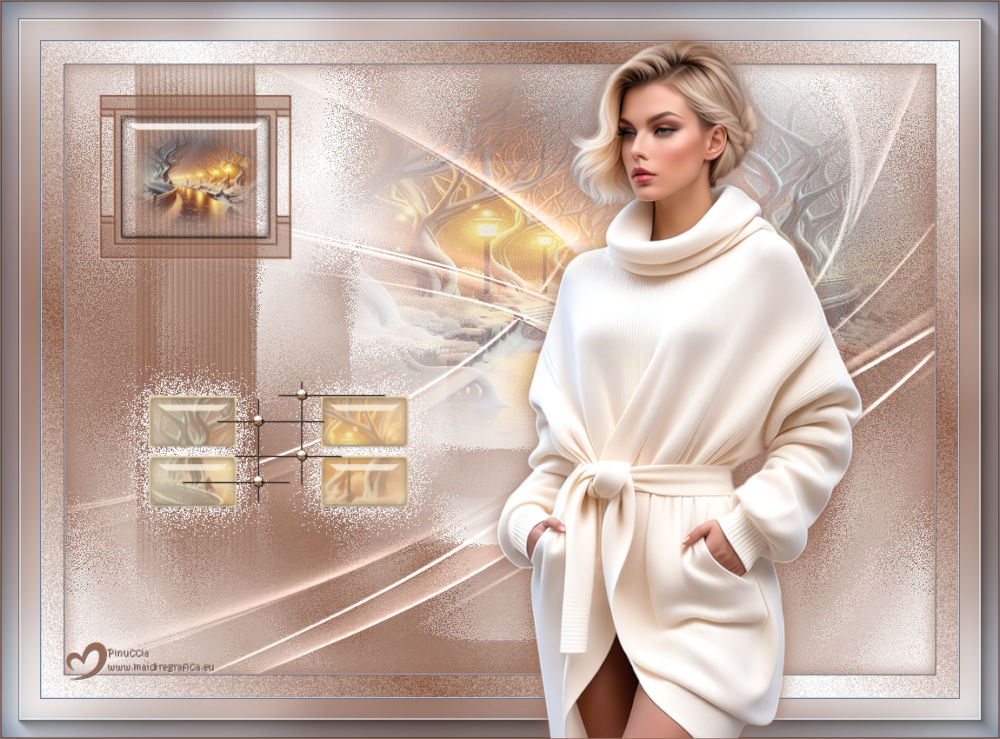
NOCHE FRIA
 COLD NIGHT COLD NIGHT
Thanks Yedralina for your invitation to translate your tutorials into english

This tutorial was written with PSP2020 and translated with PSPX9, PSPX8 and PSP2020, but it can also be made using other versions of PSP.
Since version PSP X4, Image>Mirror was replaced with Image>Flip Horizontal,
and Image>Flip with Image>Flip Vertical, there are some variables.
In versions X5 and X6, the functions have been improved by making available the Objects menu.
In the latest version X7 command Image>Mirror and Image>Flip returned, but with new differences.
See my schedule here
 italian translation here italian translation here
 french translation here french translation here
 your versions here your versions here

For this tutorial, you will need:

Thanks for the tubes Clo and Mentali; for a mask Silvie; the author of the second mask is unknown.
The rest of the material is by Yedralina.
(The links of the tubemakers here).

consult, if necessary, my filter section here
Filters Unlimited 2.0 here
Mehdi - Sorting Tiles here
Mura's Seamless - Emboss at Alpha here
AAA Frames - Foto Frame here
Alien Skin Eye Candy 5 Impact - Glass here
Filters Mura's Seamless can be used alone or imported into Filters Unlimited.
(How do, you see here)
If a plugin supplied appears with this icon  it must necessarily be imported into Unlimited it must necessarily be imported into Unlimited
You can change Blend Modes according to your colors.
In the newest versions of PSP, you don't find the foreground/background gradient (Corel_06_029).
You can use the gradients of the older versions.
The Gradient of CorelX here
Copy the preset  in the folder of the plugin Alien Skin Eye Candy 5 Impact>Settings>Glass. in the folder of the plugin Alien Skin Eye Candy 5 Impact>Settings>Glass.
One or two clic on the file (it depends by your settings), automatically the preset will be copied in the right folder.
why one or two clic see here

Copy the Presets in the Presets Folder
Open the masks in PSP and minimize them with the rest of the material.
If you have problems with Alpha Channel, open a new transparent image 1000 x 700 pixels,
and use the selections from Disk.
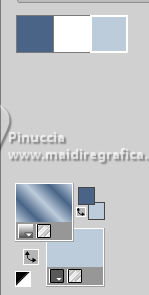
Choose two colors from your misted.
For my example:
Set your foreground color to #496487,
and your background color to white #ffffff.
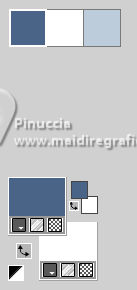
color 3 lighter than color 1 #bdccdb
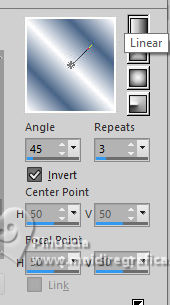
Prepare in the foreground a Foreground/Background Gradient, style Linear.
1. Open CanalAlpha_NOCHE FRIA
Window>Duplicate or, on the keyboard, shift+D to make a copy.

Close the original.
The copy, that will be the basis of your work, is not empty,
but contains the selections saved to alpha channel.
Flood Fill  the transparent image with your Gradient. the transparent image with your Gradient.
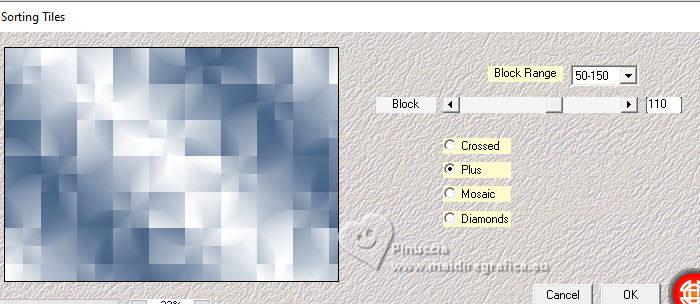
2. Effects>Plugins>Mehdi - Sorting Tiles.
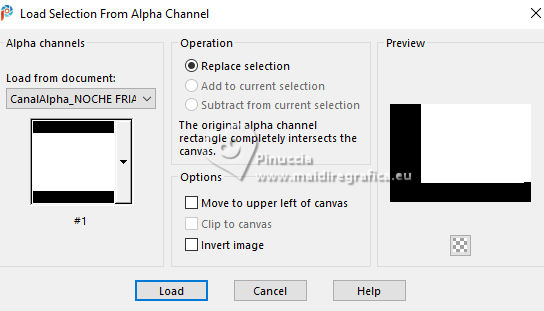
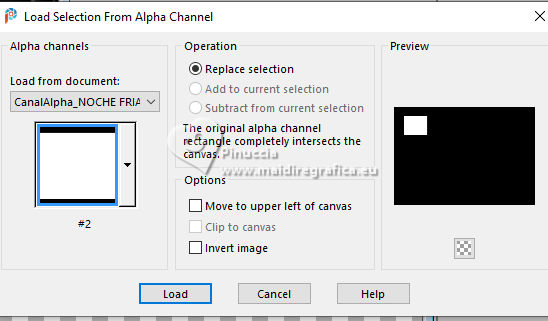
3. Selections>Load/Save Selection>Load Selection from Alpha Channel.
The selection #1 is immediately available. You just have to click Load
(from disk ©Yedralina_Sel031).
4. Layers>New Raster Layer.
Open the misted mentali-misted3604 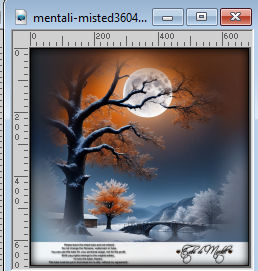
Edit>Copy.
Go back to your work and go to Edit>Paste into Selection.
Selections>Select None.
Adjust>Sharpness>Sharpen.
Move  the tube slightly higher. the tube slightly higher.
For my example, I did
Image>Flip>Flip horizontal.
This command mirrors the image but leaves it in the same position.
If you're using an older version that only has the standard Image>Mirror/Image>Flip,
you can use Image>Mirror>Mirror Horizontal,
and after move the image at the upper right
Reduce the opacity of this layer between 60 and 65%.
5. Set your foreground color to Color.
Layers>New Raster Layer.
Flood Fill the layer with your dark foreground color.
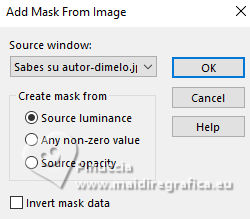
Layers>New Mask layer>From image
Open the menu under the source window and you'll see all the files open.
Select the mask Sabes su autor-dimelo (if you know th author, tell me)
Layers>Merge>Merge Group.
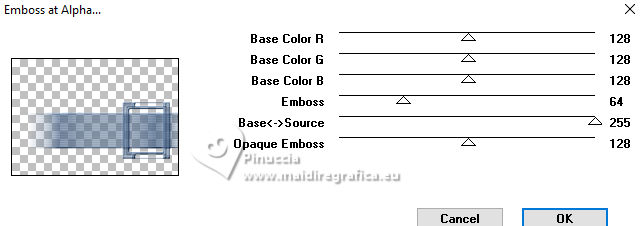
6. Effects>Plugins>Mura's Seamless - Emboss at Alpha, default settings.
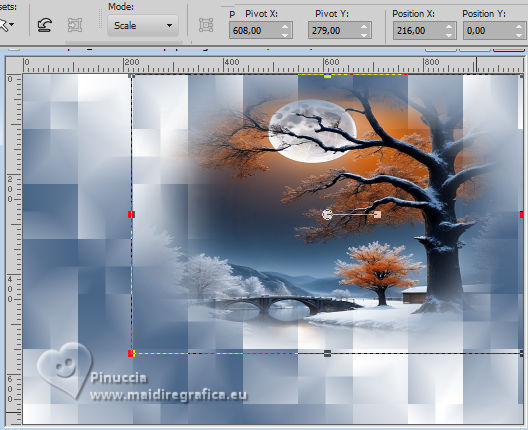
Image>Resize, to 70%, resize all layers not checked.
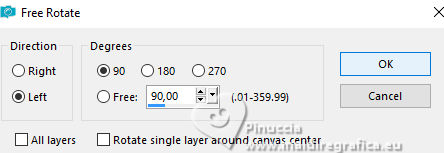
Image>Free Rotate - 90 degrees to left.
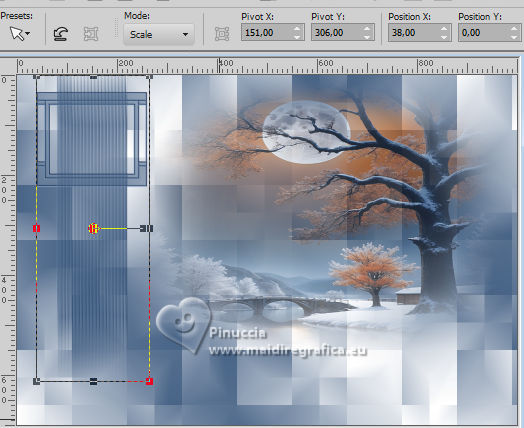
7. K key to activate your Pick Tool 
Open the presets menu and select the preset 301-Yedralina
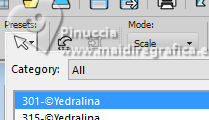
M key to deselect the Tool.
8. Layers>New Raster Layer.
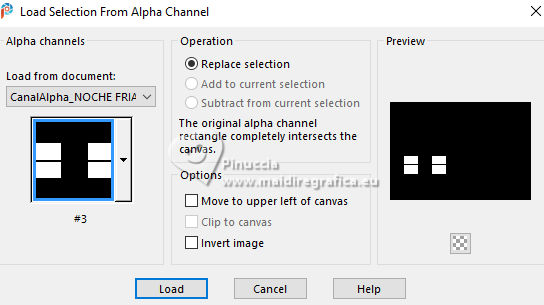
Selections>Load/Save Selection>Load Selection from Alpha Channel.
Open the selections menu and load th selection #2 (from Disk ©Yedralina_Sel0132).
Edit>Paste into Selection - the misted is still in memory.
9. Effects>Plugins>Alien Skin Eye Candy 5 Impact - Glass
Preset ©Yedralina-Glass4

Selections>Select None.
Layers>Merge>Merge Down.
10. Layers>New Raster Layer.
Selections>Load/Save Selection>Load Selection from Alpha Channel.
Open the selections menu and load th selection #3 (from Disk Sel0130).
Set again your foreground color to Gradient.
Flood Fill the selection with your Gradient.
11. Selections>Modify>Contract - 5 pixels.
Set your background color to color 3 #bdccdb
Flood Fill the selection with your background color.
Selections>Modify>Contract - 2 pixels.
Keep selected.
12. Edit>Paste as new layer - the misted is always in memory.
Image>Resize, to 50%, resize all layers not checked (you can change to your liking)
Place the tube on the selection.
Selections>Invert.
Press CANC on the keyboard 
Selections>Invert.
Reduce the opacity of this layer +/-55%.
13. Effects>Plugins>Alien Skin Eye Candy 5 Impact - preset ©Yedralina_Glass4)
Selections>Select None.
14. Layers>Merge>Merge Down.
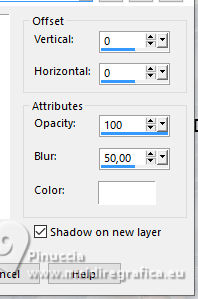
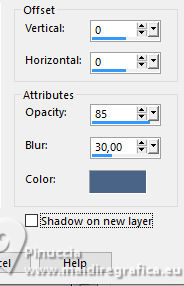
Effects>3D Effects>Drop Shadow, color white, shadow on new layer checked.
Change the Blend Mode of this layer to Dissolve.
15. Open the tube NOE_0_f8e6e_37fecf0d_orig 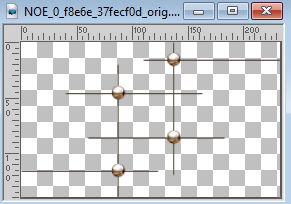
Edit>Copy.
Go back to your work and go to Edit>Paste as new layer.
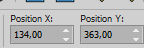
K key to activate your Pick Tool
Position X: 134,00 - Position Y: 363,00.
Layers>Arrange>Move Up
Effects>3D Effects>Drop Shadow, color black, shadow on new layer not checked.

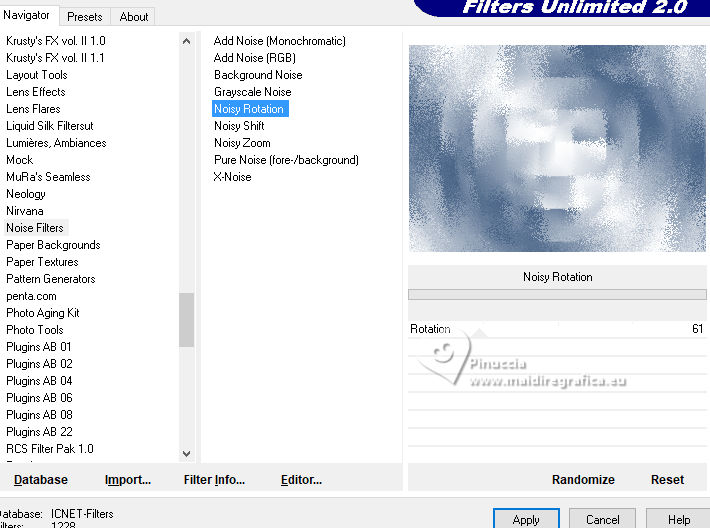
16. Activate your background color, Raster 1.
Effects>Plugins>Filters Unlimited 2.0 - Noise filters - Noisy rotation, default settings.
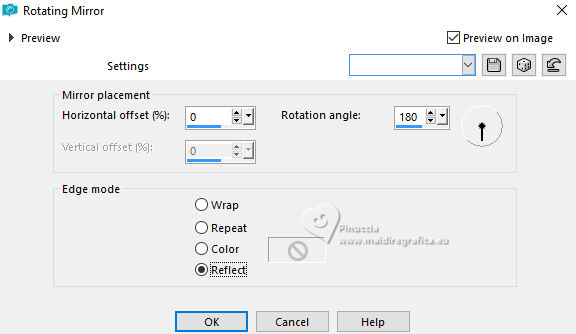
17. Effects>Reflection Effects>Rotating Mirror.
Adjust>Sharpness>Sharpen.
18. Set your background color to white.
Layers>New Raster Layer.
Flood Fill the layer with color white.
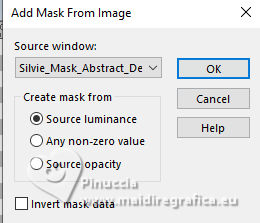
Layers>New Mask layer>From image
Open the menu under the source window
and select the mask Silvie_Mask_Abstract_Decor77U
Layers>Merge>Merge Group.
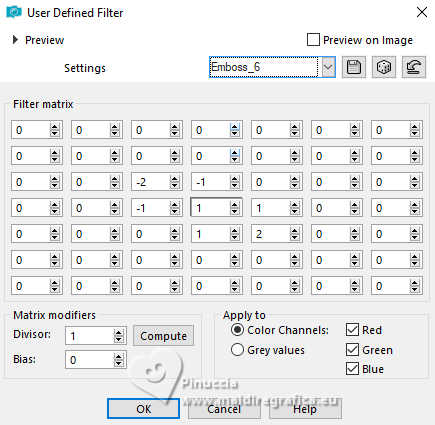
19. Effects>User Defined Filter - preset Emboss 6
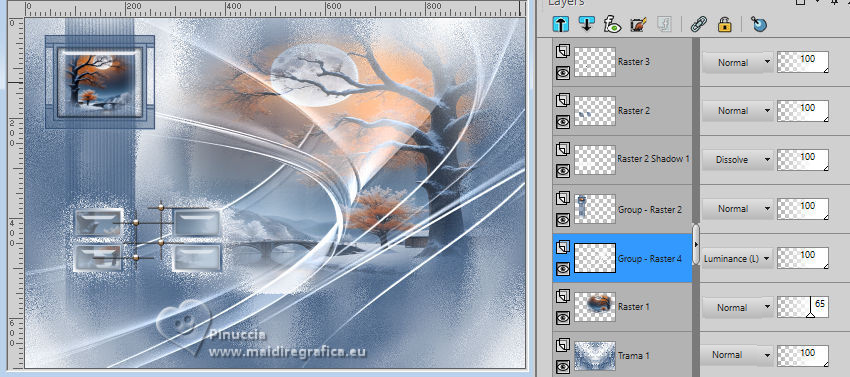
Layers>Arrange>Move up.
Optional: change the Blend Mode of this layer to Luminance (legacy).
20. Image>Add Borders, 1 pixel, symmetric, color 3 #bdccdb.
Image>Add Borders, 1 pixel, symmetric, foreground color
Selections>Select All.
Edit>Copy
21. Image>Add Borders, 25 pixels, symmetric, whatever color.
Selections>Invert.
Set your foreground color to Gradient.
Flood Fill the selection with your Gradient.
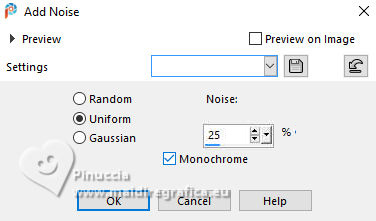
22. Adjust>Add/Remove Noise>Add Noise.
Effects>3D Effects>Drop Shadow, foreground color.
23. Image>Add Borders, 1 pixel, symmetric, color 3 #bdccdb.
Image>Add Borders, 1 pixel, symmetric, foreground color
Selections>Select All.
24. Image>Add Borders, 45 pixels, symmetric, whatever color.
Selections>Invert.
25. Edit>Paste into Selection - the image in memory from step 20.
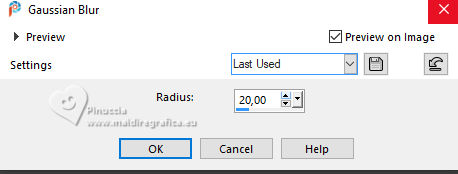
Adjust>Blur>Gaussian Blur, radius 20
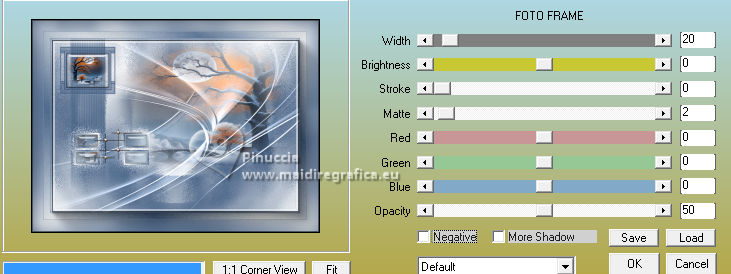
26. Effects>Plugins>AAA Frames - Foto Frame.
Selections>Select None.
27. Open your main tube Woman2465_byClo 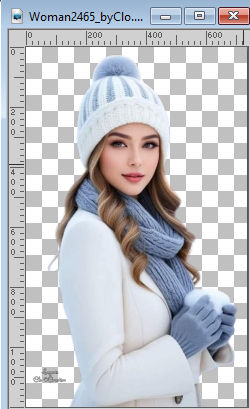
Erase the watermark and go to Edit>Copy.
Go back to your work and go to Edit>Paste as new layer.
Image>Resize, to 70%, resize all layers not checked.
Adjust>Sharpness>Sharpen.
Move the tube slightly to the right.
Effects>3D Effects>Drop Shadow, at your choice, for me last settings
28. Image>Add Borders, 1 pixel, symmetric, foreground color.
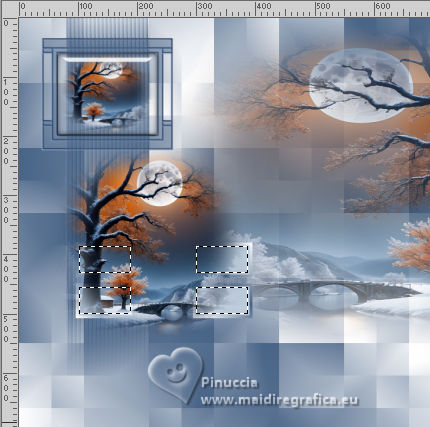
29. Image>Resize, 1000 pixels width, resize all layers checked.
30. Sign your work on a new layer.
Layers>Merge>Merge All and save as jpg.
For the tubs of these versions thanks
Kamil and Cat Dana
Virginia

If you have problems or doubts, or you find a not worked link, or only for tell me that you enjoyed this tutorial, write to me.
19 January 2025

|